This is the multi-page printable view of this section. Click here to print.
User manual
- 1: Connecting to DAIC
- 2: Data management & transfer
- 3: Software
- 3.1: Operating system
- 3.2: Available software
- 3.3: Modules
- 3.4: Installing software
- 3.5: Containerization
- 4: Job submission
- 4.1: Basics of Slurm jobs
- 4.2: Priorities, Partitions, Quality of Service & Reservations
- 4.3: Advanced Slurm jobs
- 4.4: Kerberos
- 5: Best practices
- 6: Handy commands on DAIC
1 - Connecting to DAIC
SSH access
If you have a valid DAIC account (see Access and accounts), you can access DAIC resources using an SSH client. SSH (Secure SHell) is a protocol that allows you to connect to a remote computer via a secure network connection. SSH supports remote command-line login and remote command execution. SCP (Secure CoPy) and SFTP (Secure File Transfer Protocol) are file transfer protocols based on SSH (see wikipedia's ssh page ).
SSH clients
Most modern operating systems like Linux, macOS, and Windows 10 include SSH, SCP, and SFTP clients (part of the OpenSSH package) by default. If not, you can install third-party programs like:
MobaXterm , PuTTY page , or FileZilla .
Connecting to DAIC from inside and outside TU Delft network
Access from the TU Delft Network
To connect to DAIC within TU Delft network (ie, via eduram or wired connection), open a command-line interface (prompt, or terminal, see Wikipedia's CLI page ), and run the following command:
$ ssh <YourNetID>@login.daic.tudelft.nl # Or
$ ssh login.daic.tudelft.nl             # If your username matches your NetID
<YourNetID>is your TU Delft NetID. If the username on your machine you are connecting from matches your NetID, you can omit the square brackets and their contents,[<YourNetID>@].
This will log you in into DAIC’s login1.daic.tudelft.nl node for now. Note that this setup might change in the future as the system undergoes migration, potentially reducing the number of login nodes..
Note
Currently DAIC has 3 login nodes:login1.daic.tudelft.nl, login2.daic.tudelft.nl, and login3.daic.tudelft.nl. You can connect to any of these nodes directly as per your needs. For more on the choice of login nodes, see DAIC login nodes.Note
Upon first connection to an SSH server, you will be prompted to confirm the server’s identity, with a message similar to:
The authenticity of host 'login.daic.tudelft.nl (131.180.183.244)' can't be established.
ED25519 key fingerprint is SHA256:MURg8IQL8oG5o2KsUwx1nXXgCJmDwHbttCJ9ljC9bFM.
Are you sure you want to continue connecting (yes/no/[fingerprint])? yes
Warning: Permanently added 'login.daic.tudelft.nl' (ED25519) to the list of known hosts.
A distinct fingerprint will be shown for each login node, as below:
SHA256:MURg8IQL8oG5o2KsUwx1nXXgCJmDwHbttCJ9ljC9bFMSHA256:MURg8IQL8oG5o2KsUwx1nXXgCJmDwHbttCJ9ljC9bFMSHA256:O3AjQQjCfcrwJQ4Ix4dyGaUoYiIv/U+isMT5+sfeA5QOnce identity confirmed, enter your password when prompted (nothing will be printed as you type your password):
The HPC cluster is restricted to authorized users only.
YourNetID@login.daic.tudelft.nl's password:
Next, a welcome message will be shown:
Last login: Mon Jul 24 18:36:23 2023 from tud262823.ws.tudelft.net
 #########################################################################
 #                                                                       #
 # Welcome to login1, login server of the HPC cluster.                   #
 #                                                                       #
 # By using this cluster you agree to the terms and conditions.          #
 #                                                                       #
 # For information about using the HPC cluster, see:                     #
 # https://login.hpc.tudelft.nl/                                         #
 #                                                                       #
 # The bulk, group and project shares are available under /tudelft.net/, #
 # your windows home share is available under /winhome/$USER/.           #
 #                                                                       #
 #########################################################################
 18:40:16 up 51 days,  6:53,  9 users,  load average: 0,82, 0,36, 0,53
And, now you can now verify your environment with basic commands:
YourNetID@login1:~$ hostname  # show the current hostname
login1.hpc.tudelft.nl
YourNetID@login1:~$ echo $HOME  # show the path to your home directory
/home/nfs/YourNetID
YourNetID@login1:~$ pwd  # show current path
/home/nfs/YourNetID
YourNetID@login1:~$ exit  # exit current connection
logout
Connection to login.daic.tudelft.nl closed.
In this example, the user, YourNetID, is logged in via the login node login1.hpc.tudelft.nl as can be seen from the hostname output. The user has landed in the $HOME directory, as can be seen by printing its value, and checked by the pwd command. Finally, the exit command is used to exit the cluster.
Graphical applications
We discourage running graphical applications (viassh -X) on DAIC login nodes, as GUI applications are not supported on the HPC systems.Access from outside university network using a VPN
Direct access to DAIC from outside the university network is blocked by a firewall. Therefore, a VPN is needed
You need to use TU Delft’s EduVPN or OpenVPN (See TU Delft’s Access via VPN recommendations ) to access DAIC directly. Once connected to the VPN, you can ssh to DAIC directly, as in Access from the TU Delft Network.
VPN access trouble?
If you are having trouble accessing DAIC via the VPN, please report an issue via this Self-Service link.Using the Linux Bastion Server
As of January 16th 2025, access to TU Delft bastion hosts is only possible via a VPN. Therefore, it is now recommended to activate a TU Delft VPN and directly connect to DAIC (instead of jumping via the bastion host).Simplifying SSH with Configuration Files
To simplify SSH connections, you can store configurations in a file in your local machine. The SSH configuration file can be created (or found, if already exists) in ~/.ssh/config on Linux/Mac systems, or in C:\Users\<YourUserName>\.ssh on Windows.
For example, on a Linux system, you can have the following lines in the configuration file:
~/.ssh/config
Host daic
  HostName login.daic.tudelft.nl # Or any other login node
  User <YourNetID>
where:
- The
Hostkeyword starts the SSH configuration block and specifies the name (or pattern of names, likedaicin this example) to which the configuration entries will apply.- The
HostNameis the actual hostname to log into. Numeric IP addresses are also permitted (both on the command line and in HostName specifications).- The
Useris the login username. This is especially important when the username differs between your machine and the remote server/cluster.
You can then connect to DAIC from inside TU Delft network (or behind TU Delft VPN) by just typing the following command:
$ ssh daic
Efficient SSH Connections with SSH Multiplexing
SSH multiplexing allows you to reuse an existing connection for multiple SSH sessions, reducing the time spent entering your password for every new connection. After the first connection is established, subsequent connections will be much faster since the existing control connection is reused.
To enable SSH multiplexing, add the following lines to your SSH configuration file. Assuming a Linux/Mac system, you can add the following lines to ~/.ssh/config:
~/.ssh/config
Host *
  ControlMaster auto
  ControlPath /tmp/ssh-%r@%h:%p
where:
- The
ControlPathspecifies where to store the “control socket” for the multiplexed connections.%rrefers to the remote login name,%hrefers to the target host name, and%prefers to the destination port. This ensures that SSH separates control sockets for different connections.- The
ControlMastersetting activates multiplexing. With theautosetting, SSH will use an existing master connection if available or create a new one when necessary. This configuration helps streamline SSH connections and reduces the need to enter your password for each new session.
This setup will speed up connections after the first one and reduce the need to repeatedly enter your password for each new SSH session.
Note
On Windows you may need to adjust theControlPath to match a valid path for your operating system. For example, instead of /tmp/, you might use a path like C:/Users/<YourUserName>/AppData/Local/Temp/.Important
SSH public key logins (passwordless login) are not supported on DAIC, because Kerberos authentication is required to access your home directory. You will need to enter your password for each session2 - Data management & transfer
Data Management Guidelines
DAIC login and compute nodes have direct access to standard TU Delft network storage, including your personal home folder, group storage, and project storage. It is important to use the correct storage location for your data, as each has different use cases, access rights, and quota limits.
For example, Project Storage (staff-umbrella) is the recommended location for research data, datasets, and code. In contrast, staff-bulk is a legacy storage area that is being phased out. For a complete overview of storage types, official guidelines, and quota limits, always consult the TU Delft
Overview data storage
.
This page explains the best methods for transferring data to and from these storage locations.
Recommended Workflow: Direct Data Download
The most efficient way to download large datasets from external sources (e.g. collaborators or public repositories) is to transfer them directly from your local computer to your TU Delft project storage. This avoids using the DAIC login and compute nodes, which are optimized for computation, not large data transfers, and avoids unnecessary load on the internal network.
Note
Do not connect to DAIC using sshfs! That would only (over)load the network connection to the login nodes, which would affect the interactive work of other users. Instead, download data directly to your project storage as described below.Follow these steps to download data directly to your project storage (and access it from DAIC):
1. Access your DAIC storage from your local computer
You can either mount the storage as a network drive or use an SFTP client. Mounting is often more convenient as it makes the remote storage appear like a local folder. Choose the appropriate method for your operating system:
For TU Delft-managed computers:
- Project Data Storage is mounted automatically under
This PCasProject Data (U:)or\\tudelft.net\staff-umbrella.
For personal computers:
- Connect to EduVPN first.
- Install WebDrive and connect to
sftp.tudelft.nl. Click onstaff-umbrella(this is the Project Data Storage).
Option 1: Using Finder
- Press
⌘Kor choose Go > Connect to Server. - Enter:
smb://tudelft.net/staff-umbrella/<your_project_name>and clickConnect. - (Optional) Add this address to your Favorite Servers for easy access later.
Option 2: Using an SFTP client (e.g., Terminal, FileZilla, CyberDuck)
Connect to sftp.tudelft.nl with your NetID and password. From the terminal, you can use:
sftp <YourNetID>@sftp.tudelft.nl
cd staff-umbrella/<your_project_name>
put data.zip  # Upload a file (data.zip) to your storage
get results.zip # Download a file (results.zip) from your storage
Graphical clients like FileZilla or CyberDuck provide a drag-and-drop interface for the same purpose.
For TU Delft-managed computers:
- For managed Ubuntu 22.04, contact ICT for setting up the mount.
- For Ubuntu 18.04, storage is mounted under
/tudelft.net/staff-umbrella/:- You can access it via the terminal:
cd /tudelft.net/staff-umbrella/<your_project_name> - Or via the file manager (nautilus or dolphin):
under Other locations > Computer > tudelft.net > staff-umbrella > <your_project_name>
- You can access it via the terminal:
For personal computers: Option 1: Mount with sshfs
mkdir ~/storage_mount
sshfs YourNetID@sftp.tudelft.nl:/staff-umbrella/<your_project_name> ~/storage_mount
ls ~/storage_mount # Check contents of your project storage
And, after you are done with the mount:
fusermount -u ~/storage_mount
Option 2: Use sftp
sftp <YourNetID>@sftp.tudelft.nl
cd staff-umbrella/<your_project_name>
put data.zip  # Upload a file (data.zip) to your storage
get results.zip # Download a file (results.zip) from your storage
2. Download the data directly to the storage location
Once you have mounted or connected to your storage, you can use standard tools like wget, curl, or your web browser to download files directly into that location.
For example, if you mounted your storage on Linux at ~/storage_mount, you can download a large dataset into your project folder with wget:
wget -P ~/storage_mount/datasets/ https://www.robots.ox.ac.uk/~vgg/data/flowers/102/102flowers.tgz
The file (the Oxford Flowers 102 Dataset in this example) downloads directly to your project folder in the staff-umbrella storage, using your local machine’s network connection.
Command-Line Transfer Tools
Both your Linux and Windows Personal Storage and the Project and Group Storage are also available world-wide via an SCP/SFTP client.
For direct transfers between your local machine and DAIC, or for scripting automated workflows, you can use command-line tools like scp and rsync.
SCP (Secure Copy)
The scp command provides a simple way to copy files over a secure channel. It has the following basic syntax:
$ scp <source_file> <target_destination>       # for files
$ scp -r <source_folder> <target_destination>  # for folders
For example, to transfer a file from your computer to DAIC:
$ scp mylocalfile [<YourNetID>@]login.daic.tudelft.nl:~/destination_path_on_DAIC/
To transfer a folder (recursively) from your computer to DAIC:
$ scp -r mylocalfolder [<YourNetID>@]login.daic.tudelft.nl:~/destination_path_on_DAIC/
To transfer a file from DAIC to your computer:
$ scp [<YourNetID>@]login.daic.tudelft.nl:~/origin_path_on_DAIC/remotefile ./
To transfer a folder from DAIC to your computer:
$ scp -r [<YourNetID>@]login.daic.tudelft.nl:~/origin_path_on_DAIC/remotefolder ./
The above commands work from both the university network, or when using EduVPN. If a “jump” via linux-bastion is needed (see Access from outside university network), modify the above commands by replacing scp with scp -J <YourNetID>@linux-bastion.tudelft.nl and keep the rest of the command as before:
# Transfer a local file to DAIC via the bastion host
$ scp -J [<YourNetID>@]linux-bastion.tudelft.nl <localfile> [<YourNetID>@]login.daic.tudelft.nl:/tudelft.net/staff-umbrella/<your_project_name>/

# Transfer a remote file from DAIC to your local machine via the bastion host
$ scp -J [<YourNetID>@]linux-bastion.tudelft.nl [<YourNetID>@]login.daic.tudelft.nl:/tudelft.net/staff-umbrella/<your_project_name>/<remotefile> ./
Where:
- Case is important.
- Items between < > brackets are user-supplied values (so replace with your own NetID, file or folder name).
- Items between [ ] brackets are optional: when your username on your local computer is the same as your NetID username, you don’t have to specify it.
- When you specify your NetID username, don’t forget the @ character between the username and the computer name.
Note for students
Please usestudent-linux.tudelft.nl instead of linux-bastion.tudelft.nl as an intermediate server!Hint
Use quotes when file or folder names contain spaces or special characters.rsync
rsync is a robust file copying and synchronization tool commonly used in Unix-like operating systems. It allows you to transfer files and directories efficiently, both locally and remotely. rsync supports options that enable compression, preserve file attributes, and allow for incremental updates.
Basic Usage
Copy files locally:
rsync [options] <source> <destination>This command copies files and directories from the
sourceto thedestination.Copy files remotely:
rsync [options] <source> <user>@<remote_host>:<destination>This command transfers files from a local
sourceto adestinationon a remote host.
Note
When sending data to staff-umbrella or staff-bulk, you must use the --no-perms option to avoid errors, as the underlying network filesystem does not support changing permissions.
A recommended command to use is:
$ rsync --progress -avz --no-perms <source_file> [<YourNetID>@]login.daic.tudelft.nl:<destination_umbrella_directory>
This command is effective because:
--progressshows the transfer progress.-a(archive mode) efficiently copies directories and preserves file attributes like timestamps.-vprovides verbose output.-zcompresses data to speed up the transfer.--no-permsprevents errors related to file permissions on the destination.
Examples
Synchronize a local directory with a remote directory:
rsync -avz /path/to/local/dir user@remote_host:/path/to/remote/dirThis synchronizes a local directory with a remote directory, using archive mode (
-a) to preserve file attributes, verbose mode (-v) for detailed output, and compression (-z) for efficient transfer.Synchronize a remote directory with a local directory:
rsync -avz user@remote_host:/path/to/remote/dir /path/to/local/dirThis transfers files from a remote directory to a local directory, using the same options as the previous example.
Delete files in the destination that are not present in the source:
rsync -av --delete /path/to/source/dir /path/to/destination/dirThis synchronizes the source and destination directories and deletes files in the destination that are not in the source.
Exclude certain files or directories during transfer:
rsync -av --exclude='*.tmp' /path/to/source/dir /path/to/destination/dirThis synchronizes the source and destination directories, excluding files with the
.tmpextension.
Other Options in rsync
In addition to the commonly used options, rsync provides several other options for more advanced control and customization during file transfers:
--dry-run: Perform a trial run without making any changes. This option allows you to see what would be done without actually doing it.--checksum: Use checksums instead of file size and modification time to determine if files should be transferred. This is more precise but slower.--partial: Keep partially transferred files and resume them later. This is useful in case of an interrupted transfer.--partial-dir=DIR: Specify a directory to hold partial transfers. This option works well with--partial.--bwlimit=KBPS: Limit the bandwidth used by the transfer to the specified rate in kilobytes per second. Useful for managing network load.--timeout=SECONDS: Set a maximum wait time in seconds for receiving data. If the timeout is exceeded,rsyncwill exit.--no-implied-dirs: When transferring a directory, this option prevents the creation of implied directories on the destination side that exist in the source but not explicitly specified in the transfer.--files-from=FILE: Read a list of source files from the specified FILE. This can be useful when you want to transfer specific files.--update: Skip files that are newer on the destination than the source. This is useful for incremental backups.--ignore-existing: Skip files that already exist on the destination. Useful when you want to avoid overwriting existing files.--inplace: Update files in place instead of creating temporary files and renaming them later. This can save disk space and improve speed.--append: Append data to files instead of replacing them if they already exist on the destination.--append-verify: Append data and verify it with checksums to ensure integrity.--backup: Make backups of files that are overwritten or deleted during the transfer. By default, a~is appended to the backup filename.--backup-dir=DIR: Specify a directory to store backup files.--suffix=SUFFIX: Specify a suffix to append to backup files instead of the default~.--progress: Displays the progress of the transfer, including the speed and the number of bytes transferred. This is useful for monitoring long transfers and seeing how much data has been copied so far.
These options, along with others, provide additional flexibility and control over your rsync transfers, allowing you to fine-tune the synchronization process to meet your specific needs.
3 - Software
3.1 - Operating system
At present, DAIC and DelftBlue use different software stacks. This includes differences in the operating system (CentOS 7 for DAIC vs. Red Hat Enterprise Linux 8 for DelftBlue) and, consequently, the available modules.
Be mindful that code or environments developed on one system may not run identically on the other. Check the DelftBlue modules and DAIC software pages to avoid portability issues.
Operating system
DAIC runs the Red Hat Enterprise Linux 7 distribution. Most common software—such as programming languages, libraries, and development tools—is installed on the nodes (see Available software).
However, niche or recently released packages may be missing. If your work depends on a state-of-the-art program not yet available for Red Hat 7, you’ll need to install it manually. See Installing software for instructions.
3.2 - Available software
General software
Most common general software, like programming languages and libraries, is installed on the DAIC nodes. To check if the program that you need is pre-installed, you can simply try to start it:
$ python
Python 2.7.5 (default, Jun 28 2022, 15:30:04)
[GCC 4.8.5 20150623 (Red Hat 4.8.5-44)] on linux2
Type "help", "copyright", "credits" or "license" for more information.
>>> quit()
To find out which binary is used exactly you can use which command:
$ which python
/usr/bin/python
Alternatively, you can try to locate the program or library using the whereis command:
$ whereis python
python: /usr/bin/python3.4m-config /usr/bin/python3.6m-x86_64-config /usr/bin/python2.7 /usr/bin/python3.6-config /usr/bin/python3.4m-x86_64-config /usr/bin/python3.6m-config /usr/bin/python3.4 /usr/bin/python3.4m /usr/bin/python2.7-config /usr/bin/python3.6 /usr/bin/python3.4-config /usr/bin/python /usr/bin/python3.6m /usr/lib/python2.7 /usr/lib/python3.4 /usr/lib/python3.6 /usr/lib64/python2.7 /usr/lib64/python3.4 /usr/lib64/python3.6 /etc/python /usr/include/python2.7 /usr/include/python3.4m /usr/include/python3.6m /usr/share/man/man1/python.1.gz
Or, you can check if the package is installed using the rpm -q command as follows:
$ rpm -q python
python-2.7.5-94.el7_9.x86_64
$ rpm -q python4
package python4 is not installed
You can also search with wildcards:
$ rpm -qa 'python*'
python2-wheel-0.29.0-2.el7.noarch
python2-cryptography-1.7.2-2.el7.x86_64
python34-virtualenv-15.1.0-5.el7.noarch
python-networkx-1.8.1-12.el7.noarch
python-gobject-3.22.0-1.el7_4.1.x86_64
python-gofer-2.12.5-3.el7.noarch
python-iniparse-0.4-9.el7.noarch
python-lxml-3.2.1-4.el7.x86_64
python34-3.4.10-8.el7.x86_64
python36-numpy-f2py-1.12.1-3.el7.x86_64
...
Useful commands on DAIC
For a list of handy commands on DAIC have a look here.
3.3 - Modules
In the context of Unix-like operating systems, the module command is part of the environment modules system, a tool that provides a dynamic approach to managing the user environment. This system allows users to load and unload different software packages or environments on demand. Some often used third-party software (e.g., CUDA, cuDNN, MATLAB) is pre-installed on the cluster as
environment modules
.
Usage
To see or use the available modules, first, enable the software collection:
$ module use /opt/insy/modulefiles
Now, to see all available packages and versions:
$ module avail
---------------------------------------------------------------------------------------------- /opt/insy/modulefiles ----------------------------------------------------------------------------------------------
   albacore/2.2.7-Python-3.4        cuda/11.8                 cudnn/11.5-8.3.0.98        devtoolset/6    devtoolset/10        intel/oneapi  (D)    matlab/R2021b (D)    miniconda/3.9             (D)
   comsol/5.5                       cuda/12.0                 cudnn/12-8.9.1.23   (D)    devtoolset/7    devtoolset/11 (D)    intel/2017u4         miniconda/2.7        nccl/11.5-2.11.4
   comsol/5.6                (D)    cuda/12.1          (D)    cwp-su/43R8                devtoolset/8    diplib/3.2           matlab/R2020a        miniconda/3.7        openmpi/4.0.1
   cuda/11.5                        cudnn/11-8.6.0.163        cwp-su/44R1         (D)    devtoolset/9    :
   ...
- D is a label for the default module in case multiple versions are available. E.g.
module load cudawill loadcuda/12.1 - L means a module is currently loaded
To check the description of a specific module:
$ module whatis cudnn
cudnn/12-8.9.1.23   : cuDNN 8.9.1.23 for CUDA 12
cudnn/12-8.9.1.23   : NVIDIA CUDA Deep Neural Network library (cuDNN) is a GPU-accelerated library of primitives for deep neural networks.
And to use the module or package, load it as follows:
$ module load cuda/11.2 cudnn/11.2-8.1.1.33 # load the module

$ module list                               # check the loaded modules

Currently Loaded Modules:
   1) cuda/11.2   2) cudnn/11.2-8.1.1.33
Note
For more information about using the module system, runmodule help.Compilers and Development Tools
The cluster provides several compilers and development tools. The following table lists the available compilers and development tools. These are available in the devtoolset module:
$ module use /opt/insy/modulefiles
$ module avail devtoolset

---------------------------------------------------------------------------------------------- /opt/insy/modulefiles ----------------------------------------------------------------------------------------------
   devtoolset/6    devtoolset/7    devtoolset/8    devtoolset/9    devtoolset/10    devtoolset/11 (L,D)

  Where:
   L:  Module is loaded
   D:  Default Module

If the avail list is too long consider trying:

"module --default avail" or "ml -d av" to just list the default modules.
"module overview" or "ml ov" to display the number of modules for each name.

Use "module spider" to find all possible modules and extensions.
Use "module keyword key1 key2 ..." to search for all possible modules matching any of the "keys".

$ module whatis devtoolset
devtoolset/11       : Developer Toolset 11 Software Collection
devtoolset/11       : GNU Compiler Collection, GNU Debugger, and other development, debugging, and performance monitoring tools.

$ module load devtoolset/11
$ gcc --version
gcc (GCC) 11.2.1 20220127 (Red Hat 11.2.1-9)
Copyright (C) 2021 Free Software Foundation, Inc.
This is free software; see the source for copying conditions.  There is NO
warranty; not even for MERCHANTABILITY or FITNESS FOR A PARTICULAR PURPOSE.
3.4 - Installing software
Basic principles
On a cluster, it’s important that software is available and identical on all nodes, both login and compute nodes (see Workload scheduler). For self-installed software, it’s easier to install the software in one shared location than installing and maintaining the same software separately on every single node. You should therefore install your software on one of the network shares (e.g., your
$HOMEfolder or anumbrellaorbulkfolder) that are accessible from all nodes (see Storage).As a regular Linux user you don’t have administrator rights. Yet, you can do your normal work, including installing software in a personal folder, without needing administrator rights. Consequently, you don’t need (nor are you allowed) to use the
sudoorsucommands that are often shown in manuals.Like other clusters, DAIC has a set quota on
$HOMEdirectories (see Checking Quota Limits). It means that installing software in your$HOMEdirectory is limited. If you need more space, you should use a project share (see Storage).Both group storage (under
/tudelft.net/staff-groups/or/tudelft.net/staff-bulk/) and project storage (under/tudelft.net/staff-umbrella/) are Windows-based, leading to problems installing packages with tools likepipdue to file permission errors. Therefore, the recommended way of using your own software and environments is to use containerization and to store your containers under/tudelft.net/staff-umbrella/.... Check out the Apptainer tutorial for guidance.
Stop!
Although both Linux flavors Red Hat Enterprise Linux (RHEL, CentOS, Scientific Linux, Fedora) and Debian (Ubuntu) can run the same Linux software, they use completely different package systems for installing software. The available software, packages’ names and package versions might differ, and the package formats and package management tools are incompatible. This means:
- It is not possible to install Ubuntu or Debian
.debpackages in CentOS or useapt-getto install software in DAIC. So when installing software, use a manual for CentOS, Red Hat or Fedora. - If you can only find a manual for Ubuntu, you have to substitute the CentOS versions for any Ubuntu-specific packages or commands.
Managing environments
Conda/Mamba
Conda and Mamba are both package management and environment management tools used primarily in the data science and programming communities. Conda, developed by Anaconda, Inc., allows users to manage packages and create isolated environments for different projects, supporting multiple languages like Python and R. Mamba is a more recent alternative to Conda that offers faster performance and improved dependency solving using the same package repositories as Conda. Both tools help avoid dependency conflicts and simplify the management of software packages and environments. You can install it with:
Use module load conda
Miniconda is available as module.
$ module use /opt/insy/modulefiles  # If not already
$ module load miniconda
$ which conda
/opt/insy/miniconda/3.9/bin/conda
Creating a conda environment
To create a new environment you can run conda create:
$ conda create -n env
Collecting package metadata (current_repodata.json): done
Solving environment: done

==> WARNING: A newer version of conda exists. <==
  current version: 4.10.1
  latest version: 24.3.0

Please update conda by running

    $ conda update -n base -c defaults conda

 ## Package Plan ##

  environment location: /home/nfs/username/.conda/envs/env
Creating a conde environment from a YAML file
Conda allows you to create environments from a YAML file that specifies the packages and their versions for the desired environment. This feature makes it easier to reproduce environments across different machines and share environment configurations with others.
$ conda env create -f environment.yml (-n new-name)
For how to create a environment.yml file see Exporting environments
Environment variables
You can set enviromnet variables to install packages and environments in other locations:
CONDA_PREFIX: This variable points to the active conda environment’s root directory. When an environment is active,CONDA_PREFIXcontains the path to that environment’s root directory.CONDA_ENVS_DIRS: This variable specifies the directories where conda environments are stored. You can set it to a list of directories (separated by colons on Unix-like systems and semicolons on Windows). Conda will search for and store environments in these directories.CONDA_PKGS_DIRS: This variable specifies the directories where conda stores downloaded packages. LikeCONDA_ENVS_DIRS, you can set it to a list of directories. Conda uses these directories as cache locations for package downloads and installations.
Examples
- Set conda environments directory:
$ export CONDA_ENVS_DIRS="/tudelft.net/staff-umbrella/my-project/"
A caveat is that the /tudelft.net mounts are windows based and therefore have compatibility issues with pip. When you create your conda environments there you will not be able to use pip to install packages. It is therefore recommeneded to keep the conda environments minimal and in your home directory, and to use containerization for larger environments.
List existing environments
You can list environments with
$ conda env list
Activating environments
You can activate an existing environemnt with conda activate, for example to install more packages:
$ conda activate env # Activate the newly created environment
Modifying environments
Sometimes you need to add/remove/change packages and libraries in existing environments. First, activate the enviroment you want to change with conda activate and then run conda install package-name or conda remove package-name. You can also use pip to install packages inside a conda environment, but for that pip has to be installed inside the environment. To make sure pip is installed in your enviroment run conda install pip first.
(env) $ conda install pandas  # Add a new package to the active environment
Collecting package metadata (current_repodata.json): done
Solving environment: done

==> WARNING: A newer version of conda exists. <==
  current version: 4.10.1
  latest version: 24.3.0

Please update conda by running

    $ conda update -n base -c defaults conda

## Package Plan ##

  environment location: /home/nfs/sdrwacker/.conda/envs/test

  added / updated specs:
    - pandas

The following packages will be downloaded:

    package                    |            build
    ---------------------------|-----------------
    blas-1.0                   |              mkl           6 KB
    bottleneck-1.3.7           |  py312ha883a20_0         140 KB
    bzip2-1.0.8                |       h5eee18b_5         262 KB
    expat-2.6.2                |       h6a678d5_0         177 KB
    intel-openmp-2023.1.0      |   hdb19cb5_46306        17.2 MB
    ld_impl_linux-64-2.38      |       h1181459_1         654 KB
    libffi-3.4.4               |       h6a678d5_0         142 KB
    libuuid-1.41.5             |       h5eee18b_0          27 KB
    mkl-2023.1.0               |   h213fc3f_46344       171.5 MB
    mkl-service-2.4.0          |  py312h5eee18b_1          66 KB
    mkl_fft-1.3.8              |  py312h5eee18b_0         204 KB
    mkl_random-1.2.4           |  py312hdb19cb5_0         284 KB
    ncurses-6.4                |       h6a678d5_0         914 KB
    numexpr-2.8.7              |  py312hf827012_0         149 KB
    numpy-1.26.4               |  py312hc5e2394_0          11 KB
    numpy-base-1.26.4          |  py312h0da6c21_0         7.7 MB
    openssl-3.0.13             |       h7f8727e_0         5.2 MB
    pandas-2.2.1               |  py312h526ad5a_0        15.4 MB
    pip-23.3.1                 |  py312h06a4308_0         2.8 MB
    python-3.12.3              |       h996f2a0_0        34.8 MB
    pytz-2023.3.post1          |  py312h06a4308_0         197 KB
    readline-8.2               |       h5eee18b_0         357 KB
    setuptools-68.2.2          |  py312h06a4308_0         1.2 MB
    six-1.16.0                 |     pyhd3eb1b0_1          18 KB
    sqlite-3.41.2              |       h5eee18b_0         1.2 MB
    tbb-2021.8.0               |       hdb19cb5_0         1.6 MB
    tk-8.6.12                  |       h1ccaba5_0         3.0 MB
    tzdata-2024a               |       h04d1e81_0         116 KB
    wheel-0.41.2               |  py312h06a4308_0         131 KB
    xz-5.4.6                   |       h5eee18b_0         651 KB
    zlib-1.2.13                |       h5eee18b_0         103 KB
    ------------------------------------------------------------
                                           Total:       266.1 MB

The following NEW packages will be INSTALLED:

  _libgcc_mutex      pkgs/main/linux-64::_libgcc_mutex-0.1-main
  _openmp_mutex      pkgs/main/linux-64::_openmp_mutex-5.1-1_gnu
  blas               pkgs/main/linux-64::blas-1.0-mkl
  bottleneck         pkgs/main/linux-64::bottleneck-1.3.7-py312ha883a20_0
  bzip2              pkgs/main/linux-64::bzip2-1.0.8-h5eee18b_5
  ca-certificates    pkgs/main/linux-64::ca-certificates-2024.3.11-h06a4308_0
  expat              pkgs/main/linux-64::expat-2.6.2-h6a678d5_0
  intel-openmp       pkgs/main/linux-64::intel-openmp-2023.1.0-hdb19cb5_46306
  ld_impl_linux-64   pkgs/main/linux-64::ld_impl_linux-64-2.38-h1181459_1
  libffi             pkgs/main/linux-64::libffi-3.4.4-h6a678d5_0
  libgcc-ng          pkgs/main/linux-64::libgcc-ng-11.2.0-h1234567_1
  libgomp            pkgs/main/linux-64::libgomp-11.2.0-h1234567_1
  libstdcxx-ng       pkgs/main/linux-64::libstdcxx-ng-11.2.0-h1234567_1
  libuuid            pkgs/main/linux-64::libuuid-1.41.5-h5eee18b_0
  mkl                pkgs/main/linux-64::mkl-2023.1.0-h213fc3f_46344
  mkl-service        pkgs/main/linux-64::mkl-service-2.4.0-py312h5eee18b_1
  mkl_fft            pkgs/main/linux-64::mkl_fft-1.3.8-py312h5eee18b_0
  mkl_random         pkgs/main/linux-64::mkl_random-1.2.4-py312hdb19cb5_0
  ncurses            pkgs/main/linux-64::ncurses-6.4-h6a678d5_0
  numexpr            pkgs/main/linux-64::numexpr-2.8.7-py312hf827012_0
  numpy              pkgs/main/linux-64::numpy-1.26.4-py312hc5e2394_0
  numpy-base         pkgs/main/linux-64::numpy-base-1.26.4-py312h0da6c21_0
  openssl            pkgs/main/linux-64::openssl-3.0.13-h7f8727e_0
  pandas             pkgs/main/linux-64::pandas-2.2.1-py312h526ad5a_0
  pip                pkgs/main/linux-64::pip-23.3.1-py312h06a4308_0
  python             pkgs/main/linux-64::python-3.12.3-h996f2a0_0
  python-dateutil    pkgs/main/noarch::python-dateutil-2.8.2-pyhd3eb1b0_0
  python-tzdata      pkgs/main/noarch::python-tzdata-2023.3-pyhd3eb1b0_0
  pytz               pkgs/main/linux-64::pytz-2023.3.post1-py312h06a4308_0
  readline           pkgs/main/linux-64::readline-8.2-h5eee18b_0
  setuptools         pkgs/main/linux-64::setuptools-68.2.2-py312h06a4308_0
  six                pkgs/main/noarch::six-1.16.0-pyhd3eb1b0_1
  sqlite             pkgs/main/linux-64::sqlite-3.41.2-h5eee18b_0
  tbb                pkgs/main/linux-64::tbb-2021.8.0-hdb19cb5_0
  tk                 pkgs/main/linux-64::tk-8.6.12-h1ccaba5_0
  tzdata             pkgs/main/noarch::tzdata-2024a-h04d1e81_0
  wheel              pkgs/main/linux-64::wheel-0.41.2-py312h06a4308_0
  xz                 pkgs/main/linux-64::xz-5.4.6-h5eee18b_0
  zlib               pkgs/main/linux-64::zlib-1.2.13-h5eee18b_0


Proceed ([y]/n)? y
....
Exporting environments
You can export versions of all installed packages and libaries inside a coda environment with conda env export.
It is good practice to keep track of all versions that you have used for a particular experiment by exporting it into a YAML file typically called environment.yml:
$ conda env export --no-builds > environment.yml
Install your own mamba/conda
Sometimes the versions provided by module are outdated and users need their own installation of conda or mamba.
A minimal version can be installed as demonstrated in the following:
$ alias install-miniforge='
    wget https://github.com/conda-forge/miniforge/releases/latest/download/Miniforge3-Linux-x86_64.sh \
    && bash Miniforge3-Linux-x86_64.sh -b \
    && rm -f Miniforge3-Linux-x86_64.sh \
    && eval "$($HOME/miniforge3/bin/conda shell.bash hook)" \
    && conda init \
    && conda install -n base -c conda-forge mamba'

$ cd ~ && install-miniforge

(base) $  # This shows that the 'base' environment is active.
(base) $ which python
~/miniforge3/bin/python
This will already occupy around 500MB in your $HOME directory, totaling ~20,000 files. Make sure to stay within your quota (see system specifications).
$ du -h miniforge3 --max-depth=0
486M	miniforge3

$ find miniforge3 -type f | wc -l
20719
Now, you can install your own versions of libraries and programs, or create entire environments as descibed above.
Stop!
You are limited to a fixed quota in your$HOME directory (see Personal Storage). Installing a full development environment (e.g. for PyTorch) can easily exceed this quota. Therefore, it is recommended to install only essential tools and libraries in your $HOME directory. For larger environments, consider installing them in a project (preferred) or group share.Using binaries
Some programs come as precompiled binaries or are written in a scripting language such as Perl, PHP, Python or shell script. Most of these programs don’t actually need to be “installed” since you can simply run these programs directly. In certain scenarios, you may need to make the program executable first using chmod +x:
$ ./my-executable        # attempting to run the binary `my-executable`
-bash: ./my-executable: Permission denied

$ chmod +x program       # making `my-executable` executable, since it fails due to permissions

$ ./my-executable        # checking `my-executable` works!
Hello world!
Installing from source
When a pre-made binary of your software is not available, you’ll have to install the software yourself from the source. You may need to set up your Installation environment before following this Installation recipe.
Installation environment
When you are installing software for the very first time, you need to set up your environment. If you have already done this before , you can skip this section and go directly to the Installation recipe section.
To set up your environment, first, add the following lines to your ~/.bash_profile or, alternatively, download this (bash_profile.txt) as shown in the subsequent commands:
# Get the aliases and functions
if [ -f ~/.bashrc ]; then
   . ~/.bashrc
fi

# User specific environment and startup settings
export PREFIX="$HOME/.local"
export ACLOCAL_PATH="$PREFIX/share/aclocal${ACLOCAL_PATH:+:$ACLOCAL_PATH}"
export CPATH="$PREFIX/include${CPATH:+:$CPATH}"
export LD_LIBRARY_PATH="$PREFIX/lib64:$PREFIX/lib${LD_LIBRARY_PATH:+:$LD_LIBRARY_PATH}"
export LIBRARY_PATH="$PREFIX/lib64:$PREFIX/lib${LIBRARY_PATH:+:$LIBRARY_PATH}"
export MANPATH="$PREFIX/share/man${MANPATH:+:$MANPATH}"
export PATH="$HOME/bin:$PREFIX/bin:$PATH"
export PERL5LIB="$PREFIX/lib64/perl5:$PREFIX/share/perl5${PERL5LIB:+:$PERL5LIB}"
export PKG_CONFIG_PATH="$PREFIX/lib64/pkgconfig:$PREFIX/share/pkgconfig${PKG_CONFIG_PATH:+:$PKG_CONFIG_PATH}"
export PYTHONPATH="$PREFIX/lib/python2.7/site-packages${PYTHONPATH:+:$PYTHONPATH}"
Note!
- if you already have some of these settings in your
~/.bash_profile(or elsewhere), you should combine them so they don’t duplicate the paths. - if you want to use
python3.6instead ofpython2.7, you need to set thePYTHONPATHtopython3.6.
$ cp ~/.bash_profile ~/.bash_profile.bak # back up your file
$ curl -s https://wiki.tudelft.nl/pub/Research/InsyCluster/InstallingSoftware/bash_profile.txt >> ~/.bash_profile # download and append the lines above
Then, clean up any duplicate settings, and:
$ source ~/.bash_profile
$ mkdir -p "$PREFIX"
The line export PREFIX="$HOME/.local" sets your software installation directory to /home/nfs/<YourNetID>/.local (which is the default and accessible on all nodes). This is in your personal home directory, which has a fixed quota (see Personal storage). For software intended to be shared with others, you should instead use a project (preferred) or group share.
export PREFIX="/tudelft.net/staff-umbrella/<your-project>/software"
The other variables will let you use your self-installed programs. You are now ready to install your software!
Installation recipe
Software installation usually just requires you to follow the general installation recipe described below, but you always need to consult the documentation for your software.
- Place the source of the software in a folder under
/tmp:
$ mkdir /tmp/$USER
$ cd /tmp/$USER
You can sometimes download the software directly from the internet:
$ wget http://host/path/software.tar.gz
$ tar -xzf software.tar.gz
Or, clone the software from a git repository:
$ git clone https://github.com/software
Then:
$ cd software
Note
Note:.tgz is the same as .tar.gz, for .tar.bz2 files use tar -xjf software.tar.bz2.- If the software provides a
configurescript, run it:
$ ./configure --prefix="$PREFIX"
If configure complains about missing software, you’ll either have to install that software, tell configure where it is (--with-feature _path_=) or disable the feature (--disable-feature).
If your software provides a CMakeLists.txt file, run cmake (note: the trailing two dots on the last line are needed exactly as shown):
$ mkdir -p build $ cd build $ cmake -DCMAKE_INSTALL_PREFIX="$PREFIX" ..
Again, if cmake complains about missing software, you’ll either have to install that software or tell cmake where it is (-DCMAKE_SYSTEM_PREFIX_PATH="/usr/local;/usr;$PREFIX;path").
If neither is provided, consult the documentation for dependencies and configuration (specifically for the installation directory).
There is no point in continuing until all reported problems have been fixed.
- Compile the software:
$ make
If compilation is aborted due to an error, Google the error for possible solutions. Again, there is no point in continuing until all reported problems have been fixed.
- Install the software. When you used configure or cmake, you can simply run:
$ make install
When you used neither, you need to use:
$ make prefix="$PREFIX" install
- Your software should now be ready to use, so check it:
$ cd $ _program_
- When the program works, clean up
/tmp/netid:
$ rm -r /tmp/$USER
3.5 - Containerization
Apptainer
Apptainer is a container platform. It allows you to create and run containers that package up pieces of software in a way that is portable and reproducible. You can build a container using Apptainer on your laptop, and then run it on many on an HPC cluster. Apptainer was created to run complex applications on HPC clusters in a simple, portable, and reproducible way. This repository contains a template for building a Apptainer (former Singularity) container using miniforge, and mamba (similar to conda). The examples directory also contains examples for other setups.
Apptainer features
- Verifiable reproducibility and security, using cryptographic signatures, an immutable container image format, and in-memory decryption.
- Integration over isolation by default. Easily make use of GPUs, high speed networks, parallel filesystems on a cluster or server by default.
- Mobility of compute. The single file SIF container format is easy to transport and share.
- A simple, effective security model. You are the same user inside a container as outside, and cannot gain additional privilege on the host system by default. Read more about Security in Apptainer.
Template
The Apptainer template repository maintained by the Research Engineering and Infrastructure Team is a good starting point to create your own apptainers.
How to use Apptainer on the cluster with SLURM?
Here is an example how to use the container in a SLURM script.
#!/bin/sh
#SBATCH --job-name="apptainer-job"
#SBATCH --account="my-account"
#SBATCH --partition="general"      # Request partition.
#SBATCH --time=01:00:00            # Request run time (wall-clock). Default is 1 minute
#SBATCH --nodes=1.                 # Request 1 node
#SBATCH --tasks-per-node=1         # Set one task per node
#SBATCH --cpus-per-task=4          # Request number of CPUs (threads) per task.
#SBATCH --gres=gpu:1               # Request 1 GPU
#SBATCH --mem=4GB                  # Request 4 GB of RAM in total
#SBATCH --mail-type=END            # Set mail type to 'END' to receive a mail when the job finishes.
#SBATCH --output=slurm-%x-%j.out   # Set name of output log. %j is the Slurm jobId
#SBATCH --error=slurm-%x-%j.err    # Set name of error log. %j is the Slurm jobId

export APPTAINER_IMAGE="/path/to/my-container.sif"

# If you use GPUs
module use /opt/insy/modulefiles
module load cuda/12.1

# Run script
srun apptainer exec \
  --nv \
  --env-file ~/.env \
  -B $HOME:$HOME \
  -B /tudelft.net/:/tudelft.net/ \
  $APPTAINER_IMAGE \
  python script.py

# --nv binds NVIDIA libraries from the host (only if you use CUDA)
# --env-file source additional environment variables from e.g. .env file (optional)
# -B /$HOME:/$HOME/ mounts host file-sytem inside container
# The home folder should be mounted by default, but sometimes it is not
# -B can be used several times, change this to match your cluster file-system
# APPTAINER_IMAGE is the full path to the container.sif file
# python script.py is the command that you want to use inside the container
Tutorial
See the Apptainer tutorial.
4 - Job submission
Slurm job’s terminology: job, job step, task and CPUs
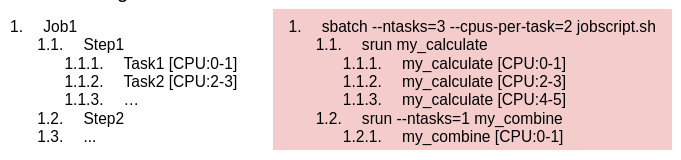
A slurm job (submitted via sbatch) can consists of multiple steps in series. Each step (specified via srun) can run multiple tasks (ie programs) in parallel. Each task gets its own set of CPUs. As an example, consider the workflow and corresponding breakdown shown in fig 2.
Slurm job’s terminology
In this example, note:
- When you explicitly request 1 CPU per task (
--cpus-per-task=1), you should also explicitly specify the number of tasks (--ntasks). Otherwise,srunmay start the task twice in parallel (because CPUs are allocated in multiples of 2) - The default slurm allocation is a single task and single CPU (ie
--ntasks=1 --cpus-per-task=1). Thus, it is not necessary to explicitly request these to run a single task on a single CPU. - When using multiple tasks, specify
--mem-per-cpu.
Note
DAIC is dual-threaded. It means that CPUs are automatically allocated in multiples of 2. Thus, in your job use (a multiple of) 2 threads.4.1 - Basics of Slurm jobs
Job script
Job scripts are text files, where the header set of directives that specify compute resources, and the remainder is the code that needs to run. All resources and scheduling are specified in the header as #SBATCH directives (see man sbatch for more information). Code could be a set of steps to run in series, or parallel tasks within these steps (see Slurm job’s terminology).
The code snippet below is a template script that can be customized to run jobs on DAIC. A useful tool that can be used to streamline the debugging of such scripts is ShellCheck .
#!/bin/sh
#SBATCH --partition=general # Request partition. Default is 'general'
#SBATCH --qos=short         # Request Quality of Service. Default is 'short' (maximum run time: 4 hours)
#SBATCH --time=0:01:00      # Request run time (wall-clock). Default is 1 minute
#SBATCH --ntasks=1          # Request number of parallel tasks per job. Default is 1
#SBATCH --cpus-per-task=2   # Request number of CPUs (threads) per task. Default is 1 (note: CPUs are always allocated to jobs per 2).
#SBATCH --mem=1024          # Request memory (MB) per node. Default is 1024MB (1GB). For multiple tasks, specify --mem-per-cpu instead
#SBATCH --mail-type=END     # Set mail type to 'END' to receive a mail when the job finishes.
#SBATCH --output=slurm_%j.out # Set name of output log. %j is the Slurm jobId
#SBATCH --error=slurm_%j.err # Set name of error log. %j is the Slurm jobId

/usr/bin/scontrol show job -d "$SLURM_JOB_ID"  # check sbatch directives are working

#Remaining job commands go below here. For example, to run a Matlab script named "matlab_script.m", uncomment:
#module use /opt/insy/modulefiles # Use DAIC INSY software collection
#module load matlab/R2020b        # Load Matlab 2020b version
#srun matlab < matlab_script.m # Computations should be started with 'srun'.
Note
- DAIC is dual-threaded. It means that CPUs are automatically allocated in multiples of 2. Thus, in your job use (a multiple of) 2 threads.
- Do not enable mails when submitting large numbers (>20) of jobs at once
Job submission
To submit a job script jobscript.sbatch, login to DAIC, and:
- To only test:
$ sbatch --test-only jobscript.sbatch
Job 1 to start at 2015-06-30T14:00:00 using 2 processors on nodes insy15 in partition general
- To actually submit the job and do the computations:
$ sbatch jobscript.sbatch
Submitted batch job 2
Using GPU resources
Some DAIC nodes have GPUs of different types, that can be used for various compute purposes (see GPUs).
To request a gpu for a job, use the sbatch directive --gres=gpu[:type][:number], where the optional [:type] and [:number] specify the type and number of the GPUs requested, as in the examples below:

Slurm directives to request gpus for a job
Note
For CUDA programs, first, load the needed modules (CUDA, cuDNN) before running your code (see Available software).An example batch script with GPU resources
#!/bin/sh
#SBATCH --partition=general # Request partition. Default is 'general'
#SBATCH --qos=short         # Request Quality of Service. Default is 'short' (maximum run time: 4 hours)
#SBATCH --time=0:01:00      # Request run time (wall-clock). Default is 1 minute
#SBATCH --ntasks=1          # Request number of parallel tasks per job. Default is 1
#SBATCH --cpus-per-task=2   # Request number of CPUs (threads) per task. Default is 1 (note: CPUs are always allocated to jobs per 2).
#SBATCH --mem=1024          # Request memory (MB) per node. Default is 1024MB (1GB). For multiple tasks, specify --mem-per-cpu instead
#SBATCH --mail-type=END     # Set mail type to 'END' to receive a mail when the job finishes.
#SBATCH --output=slurm_%j.out # Set name of output log. %j is the Slurm jobId
#SBATCH --error=slurm_%j.err # Set name of error log. %j is the Slurm jobId

#SBATCH --gres=gpu:1 # Request 1 GPU

# Measure GPU usage of your job (initialization)
previous=$(/usr/bin/nvidia-smi --query-accounted-apps='gpu_utilization,mem_utilization,max_memory_usage,time' --format='csv' | /usr/bin/tail -n '+2')

/usr/bin/nvidia-smi # Check sbatch settings are working (it should show the GPU that you requested)

# Remaining job commands go below here. For example, to run python code that makes use of GPU resources:

# Uncomment these lines and adapt them to load the software that your job requires
#module use /opt/insy/modulefiles          # Use DAIC INSY software collection
#module load cuda/11.2 cudnn/11.2-8.1.1.33 # Load certain versions of cuda and cudnn
#srun python my_program.py # Computations should be started with 'srun'. For example:

# Measure GPU usage of your job (result)
/usr/bin/nvidia-smi --query-accounted-apps='gpu_utilization,mem_utilization,max_memory_usage,time' --format='csv' | /usr/bin/grep -v -F "$previous"
Similarly, to interactively work in a GPU node:
$ hostname # check you are in one of the login nodes
login1.daic.tudelft.nl
$
$ sinteractive --cpus-per-task=1 --mem=500 --time=00:01:00 --gres=gpu:v100:1
Note: interactive sessions are automatically terminated when they reach their time limit (1 hour)!
srun: job 8607665 queued and waiting for resources
srun: job 8607665 has been allocated resources
 15:27:18 up 51 days,  3:04,  0 users,  load average: 62,09, 59,43, 44,04
SomeNetID@insy11:~$
SomeNetID@insy11:~$ hostname # check you are in one of the compute nodes
insy11.daic.tudelft.nl
SomeNetID@insy11:~$
SomeNetID@insy11:~$ nvidia-smi # check characteristics of GPU
Mon Jul 24 15:37:01 2023
+---------------------------------------------------------------------------------------+
| NVIDIA-SMI 530.30.02              Driver Version: 530.30.02    CUDA Version: 12.1     |
|-----------------------------------------+----------------------+----------------------+
| GPU  Name                  Persistence-M| Bus-Id        Disp.A | Volatile Uncorr. ECC |
| Fan  Temp  Perf            Pwr:Usage/Cap|         Memory-Usage | GPU-Util  Compute M. |
|                                         |                      |               MIG M. |
|=========================================+======================+======================|
|   0  Tesla V100-SXM2-32GB            On | 00000000:88:00.0 Off |                    0 |
| N/A   32C    P0               40W / 300W|      0MiB / 32768MiB |      0%      Default |
|                                         |                      |                  N/A |
+-----------------------------------------+----------------------+----------------------+

+---------------------------------------------------------------------------------------+
| Processes:                                                                            |
|  GPU   GI   CI        PID   Type   Process name                            GPU Memory |
|        ID   ID                                                             Usage      |
|=======================================================================================|
|  No running processes found                                                           |
+---------------------------------------------------------------------------------------+
SomeNetID@insy11:~$
SomeNetID@insy11:~$ exit # exit the interactive session
Note
To inspect a given GPU and obtain its details, you can run the following commands on an interactive session or an sbatch script.
$ sinteractive --cpus-per-task=2 --mem=500 --time=00:02:00 --gres=gpu
Note: interactive sessions are automatically terminated when they reach their time limit (1 hour)!
srun: job 8607783 queued and waiting for resources
srun: job 8607783 has been allocated resources
15:50:29 up 51 days,  3:26,  0 users,  load average: 60,33, 59,72, 54,65

SomeNetID@influ1:~$ nvidia-smi  --format=csv,noheader --query-gpu=name
NVIDIA GeForce RTX 2080 Ti

SomeNetID@influ1:~$ nvidia-smi -q | grep Architecture
Product Architecture                  : Turing

SomeNetID@influ1:~$ nvidia-smi --query-gpu=compute_cap --format=csv,noheader
7.5

SomeNetID@influ1:~$ apptainer run --nv  cuda_based_image.sif | grep "CUDA Cores"	 # using the apptainer image of the tutorial
(068) Multiprocessors, (064) CUDA Cores/MP:    4352 CUDA Cores

SomeNetID@influ1:~$ nvidia-smi  --format=csv,noheader --query-gpu=memory.total
11264 MiB

SomeNetID@influ1:~$ exit
Interactive jobs on compute nodes
To work interactively on a node, e.g., to debug a running code, or test on a GPU, start an interactive session using sinteractve <compute requirements>. If no parameters were provided, the default are applied. <compute requirement> can be specified the same way as sbatch directives within an sbatch script (see Submitting jobs), as in the examples below:
$ hostname # check you are in one of the login nodes
login1.daic.tudelft.nl
$ sinteractive
 16:07:20 up 12 days, 4:09, 2 users, load average: 7.06, 7.04, 7.12
$ hostname # check you are in a compute node
insy15
$ squeue -u SomeNetID  # Replace SomeNetId with your NetID
JOBID PARTITION  NAME     USER ST  TIME  NODES NODELIST(REASON)
    2   general  bash SomeNetI  R  1:23      1 insy15
$ logout # exit the interactive job
To request a node with certain compute requirements:
$ sinteractive --ntasks=1 --cpus-per-task=2 --mem=4096
 16:07:20 up 12 days, 4:09, 2 users, load average: 7.06, 7.04, 7.12
Warning
When you logout from an interactive session, all running processes will be terminatedNote
Requesting interactive sessions is subject to the same resource availability constraints as submitting an sbatch script. It means you may need to wait until resources are available as you would when you submit an sbatch scriptMonitoring slurm jobs
- To check your job has actually been submitted:
$ squeue -u SomeNetID  # Replace SomeNetId with your NetID
             JOBID PARTITION     NAME     USER ST       TIME  NODES NODELIST(REASON)
                 2   general  jobscip SomeNetI  R       0:01      1 insy15
- And to check the log of your job, use an editor or viewer of choice (eg,
vi,nanoor simplycat) to view the log:
$ cat slurm-2.out
JobId=2 JobName=jobscript.sbatch
   UserId=SomeNetId(123) GroupId=domain users(100513) MCS_label=N/A
   Priority=23909774 Nice=0 Account=ewi-insy QOS=short
   JobState=RUNNING Reason=None Dependency=(null)
   Requeue=0 Restarts=0 BatchFlag=1 Reboot=0 ExitCode=0:0
   DerivedExitCode=0:0
   RunTime=00:00:00 TimeLimit=00:01:00 TimeMin=N/A
   SubmitTime=2015-06-30T14:00:00 EligibleTime=2015-06-30T14:00:00
   AccrueTime=2015-06-30T14:00:00
   StartTime=2015-06-30T14:00:01 EndTime=2015-06-30T14:01:01 Deadline=N/A
   SuspendTime=None SecsPreSuspend=0 LastSchedEval=2015-06-30T14:01:01  Scheduler=Main
   Partition=general AllocNode:Sid=login1:2220
   ReqNodeList=(null) ExcNodeList=(null)
   NodeList=insy15
   BatchHost=insy15
   NumNodes=1 NumCPUs=2 NumTasks=1 CPUs/Task=2 ReqB:S:C:T=0:0:*:*
   TRES=cpu=2,mem=1G,node=1,billing=1
   Socks/Node=* NtasksPerN:B:S:C=0:0:*:* CoreSpec=*
   JOB_GRES=(null)
     Nodes=insy15 CPU_IDs=26-27 Mem=1024 GRES=
   MinCPUsNode=2 MinMemoryNode=1G MinTmpDiskNode=50M
   Features=(null) DelayBoot=00:00:00
   OverSubscribe=OK Contiguous=0 Licenses=(null) Network=(null)
   Command=/home/nfs/SomeNetId/jobscript.sbatch
   WorkDir=/home/nfs/SomeNetId
   StdErr=/home/nfs/SomeNetId/slurm_2.err
   StdIn=/dev/null
   StdOut=/home/nfs/SomeNetId/slurm_2.out
   Power=
   MailUser=SomeNetId@tudelft.nl MailType=END
Sometimes, it may be desirable to inspect slurm jobs beyond their status in the queue. For example, to check which script was submitted, or how the resources were requested and allocated. Below are a few useful commands for this purpose:
- See job definition
$  scontrol show job 8580148
JobId=8580148 JobName=jobscript.sbatch
   UserId=SomeNetID(123) GroupId=domain users(100513) MCS_label=N/A
   Priority=23721804 Nice=0 Account=ewi-insy QOS=short
   JobState=RUNNING Reason=None Dependency=(null)
   Requeue=0 Restarts=0 BatchFlag=1 Reboot=0 ExitCode=0:0
   RunTime=00:00:12 TimeLimit=00:01:00 TimeMin=N/A
   SubmitTime=2023-07-10T06:41:57 EligibleTime=2023-07-10T06:41:57
   AccrueTime=2023-07-10T06:41:57
   StartTime=2023-07-10T06:41:58 EndTime=2023-07-10T06:42:58 Deadline=N/A
   SuspendTime=None SecsPreSuspend=0 LastSchedEval=2023-07-10T06:41:58 Scheduler=Main
   Partition=general AllocNode:Sid=login1:19162
   ReqNodeList=(null) ExcNodeList=(null)
   NodeList=awi18
   BatchHost=awi18
   NumNodes=1 NumCPUs=2 NumTasks=1 CPUs/Task=2 ReqB:S:C:T=0:0:*:*
   TRES=cpu=2,mem=1G,node=1,billing=1
   Socks/Node=* NtasksPerN:B:S:C=0:0:*:* CoreSpec=*
   MinCPUsNode=2 MinMemoryNode=1G MinTmpDiskNode=50M
   Features=(null) DelayBoot=00:00:00
   OverSubscribe=OK Contiguous=0 Licenses=(null) Network=(null)
   Command=/home/nfs/SomeNetID/jobscript.sbatch
   WorkDir=/home/nfs/SomeNetID
   StdErr=/home/nfs/SomeNetID/slurm_8580148.err
   StdIn=/dev/null
   StdOut=/home/nfs/SomeNetID/slurm_8580148.out
   Power=
   MailUser=SomeNetId@tudelft.nl MailType=END
- See statistics of a running job
$ sstat 1
  JobID  AveRSS  AveCPU  NTasks  AveDiskRead AveDiskWrite
------- ------- ------- ------- ------------ ------------
1.0        426K 00:00.0       1        0.52M        0.01M
- See accounting information of a finished job (also see –long option)
$ sacct -j 8580148
JobID           JobName  Partition    Account  AllocCPUS      State ExitCode
------------ ---------- ---------- ---------- ---------- ---------- --------
8580148      jobscript+    general   ewi-insy          2  COMPLETED      0:0
8580148.bat+      batch              ewi-insy          2  COMPLETED      0:0
See overall job efficiency of a finished job
$ seff 8580148
Job ID: 8580148
Cluster: insy
User/Group: SomeNetID/domain users
State: COMPLETED (exit code 0)
Nodes: 1
Cores per node: 2
CPU Utilized: 00:00:00
CPU Efficiency: 0.00% of 00:01:00 core-walltime
Job Wall-clock time: 00:00:30
Memory Utilized: 340.00 KB
Memory Efficiency: 0.03% of 1.00 GB
Cancelling jobs
- And finally, to cancel a given job:
$ scancel <jobID>
Note
It is possible to specify the sbatch directives, like --mem, --ntasks, … etc in the command line as in:
$ sbatch --time=00:02:00 jobscript.sbatch
This specification is generally not recommended for production, as it is less reproducible than specifying within the job script itself.
4.2 - Priorities, Partitions, Quality of Service & Reservations
Slurm’s job scheduling and waiting times
When slurm is not configured for FIFO scheduling, jobs are prioritized in the following order:
- Jobs that can preempt: Not enabled in DAIC
- Jobs with an advanced reservation: See Slurm's Advanced Resource Reservation Guide
- Partition Priority Tier: See Priority tiers
- Job priority: See Priority calculations and QoS priority
- Job ID
Partitions
In SLURM, a partition is a scheduling construct that groups nodes or resources based on certain characteristics or policies. Partitions are used to organize and manage resources within a cluster, and they allow system administrators to control how jobs are allocated and executed on different nodes.
To see all paritions on DAIC, you can use the command scontrol show partition -a. To check owners of these partitions, check the Contributing departments page.
Partitions & priority tiers
DAIC partitions are tiered:
- The
generalpartition is in the lowest priority tier, - Department partitions (eg,
insy,st) are in the middle priority tier, and - Partitions for specific groups (eg,
influence,mmll) are in the highest priority tier. Those partitions correspond to resources contributed by the respective groups or departments (see Contributing departments).
When resources become available, the scheduler will first look for jobs in the highest priority partition that those resources are in, and start the highest (user) priority jobs that fit within the resources (if any). When resources remain, the scheduler will check the next lower priority tier, and so on. Finally, the scheduler will try to backfill lower (user) priority jobs that fit (if any).
The partition priorities have no impact on resources that are in use, so jobs have to wait until the resources become available.
Partition selection
The purpose of this tiering is to let you submit your jobs to multiple partitions (e.g., --partition=mml,insy,general), allowing the scheduler to determine where the job can start the soonest. This ensures your job has the highest possible priority across different partitions in the cluster, without negatively impacting your or others’ resource access.
Keep in mind that:
- Resources of all partitions (eg,
st) are also part of thegeneralpartition (see Fig 1). Thus:- Submitting to the
generalpartition allows jobs to use all nodes - Submitting to group-specific partitions alone results in longer waiting times, since the
generalpartition has much more resources than any of them (The bigger the resource pool, the more chances a job has to be scheduled or back-filled) - The optimal strategy is to submit to both
generaland group-specific partitions when accessible. This is to skip over higher-priority jobs that would otherwise get started first on resources that are also in the specific partition.
- Submitting to the
- You should only submit jobs to partitions that your account has access to. Submitting jobs to unauthorized partitions (e.g., using
--partition=insy,stwhen your submitting account does not have access to both of these) will result in the job remaining in a pending state and generate excessive logging, potentially overloading the Slurm controller nodes.
Warning
Always ensure you are submitting jobs to partitions accessible by your account. You can check your account and partition permissions with the following commands- example output for a user is shown below:
$ sacctmgr show user "$USER" withassoc Format='DefaultAccount,Account' --parsable # Check your account(s)
Def Acct|Account|
ewi-insy-prb|ewi-st|
ewi-insy-prb|ewi-insy-prb|

$ echo "Partition   AllowAccounts"; scontrol show partition -a | \
> awk '
>     /PartitionName=/ {
>         split($1, a, "=");
>         partition = a[2]
>     }
>     /AllowAccounts=/ {
>         split($2, b, "=");
>         print partition, b[2]
>     }
> ' | \
> grep -E 'ALL|ewi-insy-prb'      # Check paritions accessible to your *default* account
Partition   AllowAccounts
general ALL
insy ewi-insy,ewi-insy-cgv,ewi-insy-cys,ewi-insy-ii,ewi-insy-ii-influence,ewi-insy-mmc,ewi-insy-prb,ewi-insy-prb-dbl,ewi-insy-prb-prlab,ewi-insy-prb-spclab,ewi-insy-prb-visionlab,ewi-insy-reit,ewi-insy-sdm,ewi-insy-sup
This shows that the user can use the ewi-insy-prb or the ewi-st accounts.
The second command shows that all accounts can submit to the general partition and several accounts can submit to the insy partition.
Replace the ewi-insy-prb in the grep line above to get the partition details for your specific account.
For the example above note the following correct and incorrect examples:
#SBATCH --account=ewi-insy-prb
#SBATCH --partition=insy,general
#SBATCH --partition=insy,general
#SBATCH --account=ewi-insy-prb
#SBATCH --partition=insy,st
#SBATCH --account=ewi-st
#SBATCH --partition=insy
Priority calculations
Slurm continually calculates job priorities and schedules the execution of jobs based on its configurations. A few configuration parameters affect priority computations:
SchedulerType: The type of scheduling used based on available resources, requested resources, and job priorities. On DAIC, slurm is used withbackfillscheduling mechanism. This mechanism allows low priority jobs to backfill idle resources if doing so does not delay the expected start time of any high priority job (based on resource availability).
Tip
With sched/backfil, jobs can only be started when the resources that they request fit within the available idle resources. Thus:
- The fewer resources a job request, the higher the chance that it will fit within the available idle resources.
- The more resources a job request, the long it will have to wait before enough resources become available to start. To check how the cluster is configured, you may run:
$ scontrol show config | grep SchedulerType
SchedulerType           = sched/backfil
More details is available in Slurm’s SchedulerType
PriorityType: The way priority is computed. On DAIC, amultifactorcomputation is applied, where job priority at any given time is a weighted sum of the following factors:- Fairshare: a measure of the amount of resources that a group (ie
accountin slurm terminology) has contributed, and the historical usage of the group and the user. - QOS: the quality of service associated with the job, which is specified with the slurm
--qosdirective (see QoS priority).
- Fairshare: a measure of the amount of resources that a group (ie
Info
The whole idea behind the FairShare scheduling in DAIC is to share all the available resources fairly and efficiently with all users (instead of having strict limitations in the amount of resource use or in which hardware users can compute). The resources in the cluster are contributed in different amounts by different groups (see Contributing departments), and the scheduler makes sure that each group can use a share of the resource relative to what the group contributed. To check how the cluster is configured you may run:
$ scontrol show config | grep PriorityType
PriorityType            = priority/multifactor
$ sprio --weights
          JOBID PARTITION   PRIORITY       SITE  FAIRSHARE        QOS
        Weights                               1   20000000   40000000
The following commands are useful for checking prioritization of your own jobs:
| Command | Purpose |
|---|---|
sprio -j <YourJobID> | Determine the priority of your job |
squeue -j <YourJobID> --start | Request your job’s estimated start time |
sshare -u <YourNetID> | Determine your current fairshare value |
Info
To get more complete priority configurations of a cluster, run the command:
$ scontrol show config | grep ^Priority
PriorityParameters      = (null)
PrioritySiteFactorParameters = (null)
PrioritySiteFactorPlugin = (null)
PriorityDecayHalfLife   = 2-00:00:00
PriorityCalcPeriod      = 00:05:00
PriorityFavorSmall      = No
PriorityFlags           =
PriorityMaxAge          = 7-00:00:00
PriorityUsageResetPeriod = NONE
PriorityType            = priority/multifactor
PriorityWeightAge       = 0
PriorityWeightAssoc     = 0
PriorityWeightFairShare = 20000000
PriorityWeightJobSize   = 0
PriorityWeightPartition = 0
PriorityWeightQOS       = 40000000
PriorityWeightTRES      = (null)
Quality of Service (QoS)
When you submit a job in a slurm-based system, it enters a queue waiting for resources. The partition and Quality of Service(QoS) are the two job parameters slurm uses to assign resources for a job:
- The partition is a set of compute nodes on which a job can be scheduled. In DAIC, the nodes contributed or funded by a certain group are lumped into a corresponding partition (see Contributing departments).
All nodes in DAIC are part of the
generalpartition, but other partitions exist for prioritization purposes on select nodes (see Priority tiers). - The Quality of Service is a set of limits that controls what resources a job can use and, therefore, determines the priority level of a job. This includes the run time, CPU, GPU and memory limits on the given partition. Jobs that exceed these limits are automatically terminated (see QoS priority).
For DAIC, Table 1 shows the QoS limits on the general partition.
| *infinite QoS jobs will be killed when servers go down, eg, during maintenance. It is not recommended to submit jobs with this QoS. | ||||||||||
| Partition | QoS | Priority | Max run time | Jobs per user | CPU limits | GPU limits | Memory limits | |||
|---|---|---|---|---|---|---|---|---|---|---|
| Per QoS | Per user | Per QoS | Per user | Per QoS | Per User | |||||
| general | interactive | high | 1 hour | 1 running | - | 2 | - | 2 | - | 16G |
| short | normal | 4 hours | 10000 | 3672 (85%) | 2160 (50%) | 109 (85%) | 64 (50%) | 23159G (85%) | 13623G (50%) | |
| medium | medium | 1 ½ day | 2000 | 3456 (80%) | 1512 (35%) | 103 (80%) | 45 (35%) | 21796G (80%) | 9536G (35%) | |
| long | low | 7 days | 1000 | 3240 (75%) | 864 (20%) | 96 (75%) | 25 (20%) | 20434G (75%) | 5449G (20%) | |
| infinite* | none | infinite | 1 running | 32 | - | 2 | - | 250G | - | |
Note
The priority of a job is a function of both QoS and previous usage (less is better). Read Priority and waiting times for more information.See Quality of Service definitions
On DAIC you can check the QoS policies with the sacctmgr command:
$ sacctmgr list qos
      Name   Priority  GraceTime    Preempt   PreemptExemptTime PreemptMode                                    Flags UsageThres UsageFactor       GrpTRES   GrpTRESMins GrpTRESRunMin GrpJobs GrpSubmit     GrpWall       MaxTRES MaxTRESPerNode   MaxTRESMins     MaxWall     MaxTRESPU MaxJobsPU MaxSubmitPU     MaxTRESPA MaxJobsPA MaxSubmitPA       MinTRES
---------- ---------- ---------- ---------- ------------------- ----------- ---------------------------------------- ---------- ----------- ------------- ------------- ------------- ------- --------- ----------- ------------- -------------- ------------- ----------- ------------- --------- ----------- ------------- --------- ----------- -------------
    normal          0   00:00:00                                    cluster                              DenyOnLimit               1.000000                                                                                                                                                                                                                cpu=1
     short         50   00:00:00                                    cluster                              DenyOnLimit               1.000000 cpu=3562,gre+                                         65536                                                           04:00:00 cpu=2096,gre+                 10000                                      cpu=1,mem=1M
      long         25   00:00:00                                    cluster                              DenyOnLimit               1.000000 cpu=3144,gre+                                         65536                                                         7-00:00:00 cpu=838,gres+                  1000                                      cpu=1,mem=1M
  infinite          0   00:00:00                                    cluster                              DenyOnLimit               1.000000 cpu=32,gres/+                                         65536                                                                                          1         100                                      cpu=1,mem=1M
interacti+        100   00:00:00                                    cluster                              DenyOnLimit               2.000000                                                       65536                                                           01:00:00 cpu=2,gres/g+         1           1                                      cpu=1,mem=1M
   student         10   00:00:00                                    cluster                              DenyOnLimit               1.000000 cpu=192,gres+                                         65536                                                           04:00:00 cpu=2,gres/g+         1         100                                      cpu=1,mem=1M
reservati+        100   00:00:00                                    cluster          DenyOnLimit,RequiresReservation               1.000000                                                       65536                                                                                                  10000                                      cpu=1,mem=1M
 influence        100   00:00:00                                    cluster                              DenyOnLimit               1.000000                                                       65536                                                                                                  10000                                      cpu=1,mem=1M
guest-sho+         10   00:00:00                                    cluster                              DenyOnLimit               1.000000 cpu=200,gres+                                         65536                                                           04:00:00 cpu=128,gres+                   100                                      cpu=1,mem=1M
guest-long          0   00:00:00                                    cluster                              DenyOnLimit               1.000000 cpu=200,gres+                                         65536                                                         7-00:00:00 cpu=128,gres+         1          10                                      cpu=1,mem=1M
    medium         35   00:00:00                                    cluster                              DenyOnLimit               1.000000 cpu=3352,gre+                                         65536                                                         1-12:00:00 cpu=1466,gre+                  2000                                      cpu=1,mem=1M
How to use QoS in your sbatch scripts?
In your sbatch.slurm script you can specify the QoS with #SBATCH --qos=... option.
Example:
#!/bin/bash
#SBATCH --job-name=hello-world
#SBATCH --partition=general
#SBATCH --account=ewi-insy-reit
#SBATCH --qos=short               # This is how you specify QoS
#SBATCH --time=0:01:00
#SBATCH --nodes=1
#SBATCH --tasks-per-node=1
#SBATCH --cpus-per-task=2
#SBATCH --mem=1GB
#SBATCH --output=slurm-%n-%j.out
#SBATCH --error=slurm-%n-%j.err

srun echo 'Hi, from Slurm!'
sleep 30  # Wait for 30 seconds before exiting.
QoS priority
The purpose of the (multiple) QoSs in DAIC is to optimize the throughput of the cluster and to reduce the waiting times for jobs:
- Long jobs block resources for a long time, thus leading to long waiting times and fragmentation of resources.
- Short jobs block resources only for short times, and can more easily fill in the gaps in the scheduling of resources (thus start sooner), and are therefore better for throughput and waiting times.
Thus, DAIC has the following policy:
To stimulate short jobs, the
shortQoS has a higher priority, and allows you to use a larger part of all resources, than themediumandlongQoS.To prevent long jobs from blocking all resources in the cluster for long times (thus causing long waiting times), only a certain part of all cluster resources is available to all running
longQoS jobs (of all users) combined.All running
mediumQoS jobs together can use a somewhat larger part of all resources in the cluster, and all runningshortQoS jobs combined are allowed to fill the biggest part of the cluster.- These limits are called the QoS group limits.
- When this limit is reached, no new jobs with this QoS can be started, until some of the running jobs with this QoS finish and release some resources.
- The scheduler will indicate this with the reason
QoS Group CPU/memory/GRES limit.
To prevent one user from single-handedly using all available resources in a certain QoS, there are also limits for the total resources that all running jobs of one user in a specific QoS can use.
- These are called the QoS per-user limits.
- When this limit is reached, no new jobs of this user with this QoS can be started, until some of the running jobs of this user and with this QoS finish and release some resources.
- The scheduler will indicate this with the reason
QoS User CPU/memory/GRES limit.
These per-group and per-user limits are set by the DAIC user board, and the scheduler strictly enforces these limits. Thus, no user can use more resources than the amount that was set by the user board. Any (perceived) imbalance in the use of resources by a certain QoS or user should not be held against a user or the scheduler, but should be discussed in the user board.
Resources reservations
Slurm gives the possibility to reserve one or more compute nodes exclusively for a specific user or group of users. A reservation ensures that the designated node (or nodes) are dedicated solely to the reservation holder’s tasks and are not shared with other users during the reserved period. This feature allows users to plan the execution of future workloads, and accommodates cluster users with special needs beyond the batch system (eg latency measurement scenarios).
Note
Using reservations is in line with the General cluster usage clauses of DAIC users’ agreement. However, please be mindful that reservations are intended to facilitate special needs that cannot be satisfied by the batch system, and should not be requested to guarantee fast throughput for production runs.Requesting a Reservation
To request a reservation for nodes, please use to the Request Reservation form. You can request a reservation for an entire compute node (or a group of nodes) if you have contributed this (or these) nodes to the cluster and you have special needs that needs to be accommodated.
General guidelines for reservations’ requests:
- You can be granted a reservation only on nodes from a partition that is contributed by your group (See Computing nodes for a listing of available nodes, their features, and which paritions they belong to).
- Please ask for the least amount of resources you need as to minimize impact on other users.
- Plan ahead and request your reservation as soon as possible: Reservations usually ignore running jobs, so any running job on the machine(s) you request will continue to run when the reservation starts. While jobs from other users will not start on the reserved node(s), the resources in use by an already running job at the start time of the reservation will not be available in the reservation until this running job ends. The earlier ahead you request resources, the easier it is to allocate the requested resources.
Using reservations
Once your reservation request is approved and a reservation is placed on the system, you can run your jobs in the reservation by specifying --qos=reservation along with the following directives to your slurm commands: --reservation=<name> and --partition=<partition>. For example, to submit the job job.sbatch to a reservation named icra_iv on the cor1 node on the cor partition use:
$ sbatch --qos=reservation --reservation=icra_iv --partition=cor job.sbatch
Alternatively, it is possible to add the following lines to the job.sbatch file, and submitting this file as usual:
#SBATCH --qos=reservation
#SBATCH --reservation=icra_iv
#SBATCH --partition=cor
Note
It is possible to submit jobs to a reservation once it is created. Jobs will start immediately when the reservation is available, but already running jobs on resources will not be canceled for the reservation to start.Note
When a reservation is used to run your jobs, remember to also pass the reservation parameters to your srun steps:
$ srun --qos=reservation --reservation=<reservation_name> --partition=<partition_name> <some_script.sh>
To make use of an existing reservation you have to specify --qos=reservation and --reservation=<reservation-name> in your sbatch script.
Viewing reservations
To view all active and future reservations run the scontrol command as follows:
$ scontrol show reservations
ReservationName=icra_iv StartTime=2023-09-09T00:00:00 EndTime=2023-09-16T00:00:00 Duration=7-00:00:00
   Nodes=cor1 NodeCnt=1 CoreCnt=32 Features=(null) PartitionName=cor Flags=
   TRES=cpu=64
   Users=(null) Groups=(null) Accounts=3me-cor Licenses=(null) State=ACTIVE BurstBuffer=(null) Watts=n/a
   MaxStartDelay=(null)

ReservationName=maintenance weekend 2023-10-14 StartTime=2023-10-13T20:00:00 EndTime=2023-10-16T09:00:00 Duration=2-13:00:00
   Nodes=3dgi[1-2],100plus,awi[01-26],cor1,gpu[01-11],grs[1-4],influ[1-6],insy[11-12,14-16],tbm5,wis1 NodeCnt=58 CoreCnt=2000 Features=(null) PartitionName=(null) Flags=MAINT,IGNORE_JOBS,SPEC_NODES,ALL_NODES
   TRES=cpu=4000
   Users=root Groups=(null) Accounts=(null) Licenses=(null) State=INACTIVE BurstBuffer=(null) Watts=n/a
   MaxStartDelay=(null)
Note
- Jobs can run on a reservation only if explicitly requested as shown in the Requesting a reservation section.
- Only jobs from the
UsersorAccountsassociated with the reservation (as shown in thescontrol show reservationsoutput) will be run on the reservation STATEof a reservation will show asACTIVE(instead ofINACTIVE) during the reservation window.
4.3 - Advanced Slurm jobs
Parallelizing jobs with Job Arrays
There can be scenarios, eg in simulations or benchmarking, where a job script needs to run many times with only different parameter set each time. If done manually, keeping track of the parameter values and corresponding jobIds is cumbersome. Job Arrays are a convenient mechanism for submitting and managing such jobs.
A job array is created by adding the --array=<indexes> directive to an sbatch script (or in the command line), where <indexes> can be either a comma separated list of integers, or a range with optional step size, eg, 1-10:2. The minimum index value is 0, and the maximum is a Slurm configuration parameter (MaxArraySize - 1).
Within a job array, all jobs have the same SLURM_ARRAY_JOB_ID, but each job will have its own environment variable SLURM_ARRAY_TASK_ID that corresponds to the array index value. Additionally, all jobs in the array inherit the same compute resources requirements. In the following examples, arrays of size 2 are created, but with different indexes:
$ sbatch --array=1,4 jobscript.sbatch # Indexes specified as a list, and have values 1 and 4
Submitted batch job 8580151
$
$ squeue -u SomeNetID  # Replace SomeNetId with your NetID
             JOBID PARTITION     NAME     USER ST       TIME  NODES NODELIST(REASON)
         8580151_1   general jobscrip SomeNetID  R       0:01      1 grs4
         8580151_4   general jobscrip SomeNetID  R       0:01      1 awi18
$ sbatch --array=1-2 jobscript.sbatch  # Range specified with default step size = 1. Index have values 1 and 2
Submitted batch job 8580149
$
$ squeue -u SomeNetID  # Replace SomeNetId with your NetID
             JOBID PARTITION     NAME     USER ST       TIME  NODES NODELIST(REASON)
         8580149_1   general jobscrip SomeNetID  R       0:21      1 grs4
         8580149_2   general jobscrip SomeNetID  R       0:21      1 awi18
Note
To limit the maximum number of simultaneously running jobs in an array use the% separator, eg--array=1-15%3 to run only 3 tasks at a time.JobId and environment variables
As shown in the previous section, Parallelizing jobs with job arrays, jobs within an array are assigned special slurm variables. These variables can be exploited for various computational objectives. Among these, SLURM_ARRAY_TASK_ID is the index of an individual task within the array, and SLURM_ARRAY_JOB_ID is the slurm jobId of the entire array job.
In the simplest case, you can use the ${SLURM_ARRAY_TASK_ID} directly in a script to assign parameter values. For example, to run a workflow across a set of images image_1.png … image_5.png, you can simply create an array using the sbatch directive --array=1-5, and then, within your sbatch script, use image_${SLURM_ARRAY_TASK_ID}.png to indicate the corresponding image.
In more complex scenarios, eg, when the parameters of interest are not mappable to indexes (of a job array), you can use a config file to map the parameters to the job array indexes. For example, let’s assume the following parameters:
$ cat jobarray.config
i       Flower  Color   Origin
1       Rose    Red     Worldwide
2       Jasmine  White   Asia
3       Tulip   Various Persia&Turkey
4       Orchid  Various Worldwide
5       Lily    Various Worldwide
Now, you can use these parameters inside a job script as follows:
$ cat jobarray.sbatch
#!/bin/bash
#SBATCH --job-name=JobArrayExample
#SBATCH --ntasks=1
#SBATCH --cpus-per-task=1
#SBATCH --array=1-5             # Arry with 5 tasks
#SBATCH --output=slurm-%A_%a.out # Set name of output log. %A is SLURM_ARRAY_JOB_ID and %a is SLURM_ARRAY_TASK_ID
#SBATCH --error=slurm-%A_%a.err  # Set name of error log. %A is SLURM_ARRAY_JOB_ID and %a is SLURM_ARRAY_TASK_ID

config=jobarray.config          # Path to config file

# Obtain parameters from config file:
flower=$(awk -v ArrayTaskID=$SLURM_ARRAY_TASK_ID '$1==ArrayTaskID {print $2}' $config)
color=$(awk -v ArrayTaskID=$SLURM_ARRAY_TASK_ID '$1==ArrayTaskID {print $3}' $config)
origin=$(awk -v ArrayTaskID=$SLURM_ARRAY_TASK_ID '$1==ArrayTaskID {print $4}' $config)

# Use the parameters, eg, print the index and parameter values to a file:
echo "Array task: ${SLURM_ARRAY_TASK_ID},  Flower: ${flower}, color: ${color}, origin: ${origin}" >> output.txt

$
$ sbatch jobArray.sbatch
Submitted batch job 8580317
$ squeue -u SomeNetID  # Replace SomeNetId with your NetID
             JOBID PARTITION     NAME     USER ST       TIME  NODES NODELIST(REASON)
     8580317_[1-5]   general JobArray SomeNetID PD       0:00      1 (Priority)
In this example, slurm created 5 jobs in a job array, each using the same settings (the name JobArrayExample, the general partition, short QoS, 00:01:00 time, 1 task with 1 CPU and 1G memory, and an output and error file with both array job Id and task id). Each task looks up certain parameter values from a config file leveraging its index via the awk command.
Note
The command:
flower=$(awk -v ArrayTaskID=$SLURM_ARRAY_TASK_ID '$1==ArrayTaskID {print $2}' $config)
assigns a value to the variable flower by reading a configuration file ($config), and printing the value in the second column ({print $2}) where the first column matches the value of the ArrayTaskID variable ($1==ArrayTaskID). The ArrayTaskID is an awk variable set to the value of the SLURM environment variable SLURM_ARRAY_TASK_ID.
For more on the awk utility, see this awk tutorial.
Jobs within a task array are run in parallel, and hence, there’s no guarantee about their order of execution. This is evident looking at the output file from this example:
$ cat output.txt
Array task: 2,  Flower: Jasmine, color: White, origin: Asia
Array task: 3,  Flower: Tulip, color: Various, origin: Persia&Turkey
Array task: 1,  Flower: Rose, color: Red, origin: Worldwide
Array task: 5,  Flower: Lily, color: Various, origin: Worldwide
Array task: 4,  Flower: Orchid, color: Various, origin: Worldwide
Other slurm variables that are set inside a job array are shown in the following table, with values based on the preceding example:
| Slurm Environment Variable | Description | Value in example |
|---|---|---|
SLURM_ARRAY_JOB_ID | The first job ID of the array. | 8580317 |
SLURM_ARRAY_TASK_ID | The job array index value. | A value in range 1-5 |
SLURM_ARRAY_TASK_COUNT | The number of tasks in the job array. | 5 |
SLURM_ARRAY_TASK_MAX | The highest job array index value. | 5 |
SLURM_ARRAY_TASK_MIN | The lowest job array index value | 1 |
Slurm commands and job arrays
The squeue command reports all submitted jobs. By default, squeue reports all of the tasks associated with a job array in one line and uses a regular expression to indicate the SLURM_ARRAY_TASK_ID values. To explicitly print one job array element per line, use the --array or -r flag. The following examples highlight the difference, using the same jobarray.sbatch file from the JobId and environment variables section:
$ sbatch jobarray.sbatch
Submitted batch job 8593299
$
$ squeue -u SomeNetID  # Replace SomeNetId with your NetID
             JOBID PARTITION     NAME     USER ST       TIME  NODES NODELIST(REASON)
     8593299_[1-5]   general JobArray SomeNetID PD       0:00      1 (Priority)
$
$ squeue -r -u SomeNetID  # Replace SomeNetId with your NetID
             JOBID PARTITION     NAME     USER ST       TIME  NODES NODELIST(REASON)
         8593299_1   general JobArray SomeNetID PD       0:00      1 (Priority)
         8593299_2   general JobArray SomeNetID PD       0:00      1 (Priority)
         8593299_3   general JobArray SomeNetID PD       0:00      1 (Priority)
         8593299_4   general JobArray SomeNetID PD       0:00      1 (Priority)
         8593299_5   general JobArray SomeNetID PD       0:00      1 (Priority)
scancel, on the other hand, can be used to cancel an entire job array by specifying its SLURM_ARRAY_JOB_ID. Alternatively, to cancel a specific task (or tasks), both its SLURM_ARRAY_JOB_ID and SLURM_ARRAY_TASK_ID must be specified, possibly with a regular expression, as shown in the following examples:
$ sbatch jobarray.sbatch
$ squeue -u SomeNetID  # Replace SomeNetId with your NetID
             JOBID PARTITION     NAME     USER ST       TIME  NODES NODELIST(REASON)
     8593321_[1-5]   general JobArray SomeNetID PD       0:00      1 (Priority)
$
$ scancel 8593321_4     # Cancel task with index 4 in the array
$ squeue -u SomeNetID   # Replace SomeNetId with your NetID
             JOBID PARTITION     NAME     USER ST       TIME  NODES NODELIST(REASON)
   8593321_[1-3,5]   general JobArray SomeNetID PD       0:00      1 (Priority)
$
$ scancel 8593321_[1-3] # Cancel tasks in index range 1-3 in the array
$ squeue -u SomeNetID   # Replace SomeNetId with your NetID
             JOBID PARTITION     NAME     USER ST       TIME  NODES NODELIST(REASON)
         8593321_5   general JobArray SomeNetID PD       0:00      1 (Priority)
$
$ scancel 8593321       # Cancel all tasks in the array
$ squeue -u SomeNetID  # Replace SomeNetId with your NetID
             JOBID PARTITION     NAME     USER ST       TIME  NODES NODELIST(REASON)
$
Note
For more information on job arrays, refer to Slurm Job Array SupportDeploying dependent jobs (job chains)
In certain scenarios, it might be desirable to condition the execution of a certain job on the status of another job. In such cases, the sbatch directive --dependency=<condition>:<jobID> can be used, where <condition> specifies the type of dependency (See table 2), and <jobID> is the slurm jobID upon which dependency is based. To specify more than one dependency, the , separator is used to indicate that all dependencies must be specified, and, ? is used denotes that any dependency may be satisfied.
For example, assume the slurm job scripts, job_1.sbatch, … job_3.sbatch need to run sequentially one after the other. To start this chain, submit the first job and obtain its jobID:
$ sbatch job_1.sbatch
Submitted batch job 8580135
Next, submit the second job to run only if the first job is successful:
$ sbatch --dependency=afterok:8580135 job_2.sbatch
Submitted batch job 8580136
Note
Note that if the first job (with jobID8580135 in the example) fails, the second job (with jobID 8580136) will not run, but it will remain in the queue. You have to use scancel 8580136 to cancel this jobAnd, now, to run the third job only after the first two jobs have both run successfully:
$ sbatch --dependency=afterok:8580135,8580136 job_3.sbatch
Submitted batch job 8580140
Alternatively, if the third job is dependent on either job running successfully:
$ sbatch --dependency=afterok:8580135?8580136 job_3.sbatch
Submitted batch job 8580141
Warning
- If the jobs within a chain involve copying data files to a local disk (
/tmp) on a node, you need to make sure all jobs use the same node (--nodelist=<node>, for example--nodelist=insy15)
| Argument | Description |
|---|---|
| after | This job can begin execution after the specified jobs have begun execution |
| afterany | This job can begin execution after the specified jobs have terminated. |
| aftercorr | A task of this job array can begin execution after the corresponding task ID in the specified job has completed successfully |
| afternotok | This job can begin execution after the specified jobs have terminated in some failed state |
| afterok | This job can begin execution after the specified jobs have successfully executed |
| singleton | This job can begin execution after any previously launched jobs sharing the same job name and user have terminated |
Troubleshooting Common Issues
Please see the Frequently asked questions on Scheduler problems and Job resources
4.4 - Kerberos
Kerberos Authentication
Kerberos is an authentication protocol which uses tickets to authenticate users (and computers). You automatically get a ticket when you log in with your password on a TU Delft installed computer. You can use this ticket to authenticate yourself without password when connecting to other computers or accessing your files. To protect you from misuse, the ticket expires after 10 hours or less (even when you’re still logged in).
File access
Your Linux and Windows Home directories and the Group and Project shares are located on network fileservers, which allows you to access your files from all TU Delft installed computers. Kerberos authentication is used to enable access to, or protect, your files. Without a valid Kerberos ticket (e.g. when the ticket has expired) you will not be able to access your files but instead you will receive a Permission denied error.
Lifetime of Kerberos Tickets
Kerberos tickets have a limited valid lifetime (of up to 10 hours) to reduce the risk of abuse, even when you stay logged in. If your tickets expire, you will receive a Permission Denied error when you try to access your files and a password prompt when you try to connect to another computer. When you want your program to be able to access your files for longer than the valid ticket lifetime, you’ll have to renew your ticket (repeatedly) until your program is done. Kerberos tickets can be renewed up to a maximum renewable life period of 7 days (again to reduce the risk of abuse).
The command klist -5 lists your cached Kerberos tickets together with their expiration time and maximum renewal time:
$ klist -5
Ticket cache: FILE:/tmp/krb5cc_uid_random
Default principal: YourNetID@TUDELFT.NET

Valid starting     Expires            Service principal
01/01/01 00:00:00  01/01/01 10:00:00  krbtgt/TUDELFT.NET@TUDELFT.NET
        renew until 01/08/01 00:00:00
Where:
Ticket cache: The Kerberos tickets that have been issued to you are stored in a ticket cache file. You can have multiple ticket cache files on the same computer (from different connections, for example) with different tickets and ticket expiration times. Some ticket cache files are automatically removed when you logout.Tip
Make sure that you renew the tickets in the right ticket cache file (see thisscreenexample).Default principal: Your identity.Service principal: The identity of services that you have gotten tickets for. You always need a Kerberos ticket-granting ticket (krbtgt) in order to obtain other tickets for specific services like accessing files (nfs) or connecting to computers (host).Valid starting,Expires: Your ticket is only valid between these times (this period is called the valid lifetime). After this time you will not be able to use the service nor automatically renew the ticket (without password).Renew until: Your ticket can only be renewed without password up to this time. After this time you will have to obtain a new ticket using your password.
Renewing Kerberos tickets
If you have a valid Kerberos krbtgt ticket, you can renew it at any time (until it expires) by running the command kinit -R:
$ kinit -R
$ klist -5
Ticket cache: FILE:/tmp/krb5cc_uid_random
Default principal: YourNetID@TUDELFT.NET

Valid starting     Expires            Service principal
01/01/01 01:00:00  01/01/01 11:00:00  krbtgt/TUDELFT.NET@TUDELFT.NET
        renew until 01/08/01 00:00:00
Note
Renewing the ticket will not change the duration of the valid lifetime, i.e. akrbtgt ticket with a valid lifetime of 1 hour will, after renewal, be valid for another hour.When the krbtgt ticket has expired or reached it’s renew until time, you will have to obtain a new ticket by running kinit -r 7d (note the difference in case for the r) and authenticating with your password:
$ kinit -r 7d
Password for YourNetID@TUDELFT.NET:
$ klist -5
Ticket cache: FILE:/tmp/krb5cc_uid_random
Default principal: YourNetID@TUDELFT.NET

Valid starting     Expires            Service principal
01/01/01 11:00:00  01/01/01 21:00:00  krbtgt/TUDELFT.NET@TUDELFT.NET
        renew until 01/08/01 11:00:00
The new ticket will have a valid lifetime of 10 hours and a renewable life of 7 days.
On the TU Delft Linux desktops your Kerberos ticket is refreshed (i.e. replaced by a new ticket) automatically every time you enter your password for unlocking the screen saver.
Tip
Do not disable the screen saver password lock.On remote computers you have to manually renew your tickets before they expire.
Slurm & Kerberos
- Slurm caches your Kerberos ticket, and uses it to execute your job
- Regularly renew the ticket in Slurm’s cache while your jobs are queued or running:
$ auks -a
Auks API request succeed
- To automatically renew your ticket in Slurm’s cache until you change your NetID password, run the following on the
login1node:
$ install_keytab
Password for somebody@TUDELFT.NET:
Installed keytab.
You need to rerun this command whenever you change your NetID password (at least every 6 months). Otherwise, the automatic renewal will not work and you will receive a warning e-mail.
Renewal using screen
On the compute nodes, the screen program has been modified to allow jobs to run unattended for up to 7 days. It creates a private ticket cache (to prevent the cache from being destroyed at logout) and automatically renews your ticket up to the maximum renewable life. For example, start MATLAB in Screen with screen matlab (the order is important!).
$ screen matlab
Warning: No display specified.  You will not be able to display graphics on the screen.

                           < M A T L A B (R) >
                 Copyright 1984-2010 The MathWorks, Inc.
              Version 7.11.0.584 (R2010b) 64-bit (glnxa64)
                             August 16, 2010


  To get started, type one of these: helpwin, helpdesk, or demo.
  For product information, visit www.mathworks.com.

>>
For longer jobs you have to manually obtain a new ticket at least every 7 days by running kinit -r 7d from within screen (so you use the specific ticket cache file that screen is using):
- connect to screen (
screen -r), - create a new window (
Ctrl-a c), - run
kinit -r 7d, - exit the window (
exit) and - detach from screen (
Ctrl-a d).
$ kinit -r 7d
Password for YourNetID@TUDELFT.NET:
$ klist -5
Ticket cache: FILE:/tmp/krb5cc_uid_private
Default principal: YourNetID@TUDELFT.NET

Valid starting     Expires            Service principal
01/08/01 09:00:00  01/08/01 19:00:00  krbtgt/TUDELFT.NET@TUDELFT.NET
        renew until 01/15/01 09:00:00
$ exit
Tip
Use a repeating reminder (twice a week) in your agenda so you don’t forget.Important
When the end of the renewable life is reached, your tickets expire and your program(s) will return Permission denied errors when trying to access your files. Your program(s) will not be terminated automatically; you still have to terminate the program(s) yourself.Extra functionality can be provided by the k5start and krenew programs. On most computers these are not available by default but can be installed.
5 - Best practices
The available processing power and memory in DAIC is large, but still limited. You should use the available resources efficiently and fairly. This page lays out a few general principles and guidelines for considerate use of DAIC.
Using shared resources
The computing nodes within DAIC are primarily meant to run large, long (non-interactive) jobs. You share these resources with other users across departments. Thus, you need to be cautious of your usage so you do not hinder other users.
To help protect the active jobs and resources, when a login node becomes overloaded, new logins to this node are automatically disabled. This means that you will sometimes have to wait for other jobs to finish and at other times ICT may have to kill a job to create space for other users.
One rule: Respect your fellow users.
Implication: we reserve the right to terminate any job or process that we feel is clearly interfering with the ability of others to complete work, regardless of technical measures or its resource usage.
Best practices
- Always choose the login node with the lowest use (most importantly system load and memory usage), by checking the
Current resource usage page
or the
serverscommand for information.- Each login node displays a message at login. Make sure you understand it before proceeding. This message includes the current load of the node, so look at it at every login
- Only use the storage best suited to your files (See Storage).
Do interactive code development, debugging and testing in your local machine, as much as possible. In the cluster, try to organize your code as scripts, instead of working interactively in the command line.
If you need to test and debug in the cluster, for example, in a GPU node, request an interactive session and do not work in the login node itself (See Interactive jobs on compute nodes).
Save results frequently: your job can crash, the compute node can become overloaded, or the network shares can become unavailable.
Write your code in a modular way, so that you can continue the job from the point where it last crashed.
- Actively monitor the status of your jobs:
- Make sure your job runs normally and is not hindering other jobs. Check the following at the start of a job and thereafter at least twice a day:
- If your job is not working correctly (or halted) because of a programming error, terminate it immediately; debug and fix the problem instead of just trying again (the result will almost certainly be exactly the same).
- If your
screen’s Kerberos ticket has expired, renew it so your job can successfully save it’s results. - Use the
topprogram to monitor the cpu (%CPU) and memory (%MEM) usage of your code. If either is too high, kill your code so it doesn’t cause problems for other users. - Don’t leave
toprunning unless your are continuously watching it; press q to quit. - Watch the current resource usage (see
Current resource usage page
or use the
serverscommand), and if the node is running close to it’s limits (higher than 90% load or memory, swap or disk usage), consider moving your job to a less busy node.
- Make sure your job runs normally and is not hindering other jobs. Check the following at the start of a job and thereafter at least twice a day:
Computing on login nodes
You can use login nodes for basic tasks like compiling software, preparing submission scripts for the batch queue, submitting and monitoring jobs in the batch queue, analyzing results, and moving data or managing files.
Small-scale interactive work may be acceptable on login nodes if your resource requirements are minimal.
- Please do not run production research computations on the login nodes. If necessary, request an interactive session in these cases (See Interactive jobs on compute nodes)
Note
Most multi-threaded applications (such asJava and Matlab) will automatically use all cpu cores of a node, and thus take away processing power from other jobs. If you can specify the number of threads, set it to at most 25% (¼) of the cores in that node (for a node with 16 cores, use at most 4; this leaves enough processing capacity for other users). Also see How do I request CPUs for a multithreaded program?6 - Handy commands on DAIC
BASH commands
BASH (Bourne Again SHell) is an open-source Unix shell and command language. It is the default shell on many Linux distributions and macOS, and it’s available on Windows via the Windows Subsystem for Linux, Git BASH, and other emulators. BASH is widely used for scripting and automating tasks in a computing environment. Below are some fundamental BASH commands with examples and brief explanations, aiding users in effective navigation and task execution. Remember to use these commands carefully, especially those that can modify or delete files and directories. They are fundamental tools for interacting with BASH and managing your tasks effectively.
man
The man command is a tool for displaying the manual pages (documentation) of various commands and utilities available on Unix-like operating systems. It is an essential resource for users seeking detailed information about a specific command, program, or configuration file.
Basic Usage
Display the manual page for a command:
man <command>
This displays the manual page for the specified command.
Examples
Show the manual page for the ls command:
man ls
Show the manual page for the man command:
man man
echo
Used for displaying a line of text/string that is passed as an argument. This is a fundamental command for displaying output in shell scripts.
Example: Display “Hello, World!”.
echo "Hello, World!"
cd
Changes the current directory to another directory. It’s a basic command to navigate through the filesystem.
Example: Change to the home directory.
cd ~
ls
Lists the contents of a directory. It’s a key command to view files and directories.
Example: List all files and directories in the current directory, including hidden files.
ls -a
tree
The tree command is a utility that displays the directory structure of a path in a tree-like format. It provides a visual representation of the hierarchy of files and directories, making it easier to understand the organization of a file system.
Basic Usage
Display the directory tree structure:
tree [path]This command displays the directory structure starting from the specified path or the current directory if no path is specified.
Options
-a: Display all files and directories, including hidden ones (those starting with a dot).-d: Display only directories, omitting files.-L level: Limit the depth of the tree to the specified level.--noreport: Suppress the file and directory count summary at the end of the output.-H baseHREF: Create an HTML output starting with the specified base URL.-o filename: Output the tree structure to a file with the specified name.--charset encoding: Use the specified character encoding (e.g.,UTF-8).-P pattern: Only display files matching the specified pattern (e.g.,*.txt).-I pattern: Exclude files and directories matching the specified pattern (e.g.,*.bak).
Examples
Display the directory tree structure starting from the current directory:
treeDisplay the directory tree structure from a specific path:
tree /path/to/startDisplay only directories in the tree structure:
tree -dDisplay the tree structure and limit the depth to 2 levels:
tree -L 2Display the tree structure and output it to a file:
tree -o output.txtDisplay all files and directories, including hidden ones:
tree -a
The tree command is a helpful tool for quickly understanding the layout of a directory and its contents. It is especially useful for navigating complex file systems and identifying the location of files and directories within a hierarchy.
which
The which command shows the full path of a command’s executable file by searching the directories listed in the PATH environment variable.
Basic Usage
Find the path of a command:
which commandThis displays the full path of the specified command’s executable file.
Examples
Find the path of the
lscommand:which lsFind the path of the
pythoncommand:which python
whereis
The whereis command locates not only the executable file but also the source and manual page files of a command, if available.
Basic Usage
Locate a command:
whereis commandThis displays the paths to the executable, source, and manual page files of the specified command, if they exist.
Options
-b: Search only for binaries (executable files).-m: Search only for manual pages.-s: Search only for source files.-u: Search for any missing information (binaries, source, or manual) and report it.-B path: Add a directory to the search path for binaries.-M path: Add a directory to the search path for manual pages.-S path: Add a directory to the search path for source files.
Examples
Locate the
lscommand:whereis lsLocate the
gcccommand and its source files:whereis -s gcc
cat
Concatenates and displays file contents. It’s commonly used to view the contents of a file.
Example: Display the contents of a file named example.txt.
cat example.txt
grep
Searches for patterns in files. It’s a powerful tool for searching text using patterns.
Example: Search for the word “example” in file.txt.
grep "example" file.txt
find
Searches for files in a directory hierarchy. This command is essential for locating files and directories.
Example: Find all .txt files in the current directory.
find . -name "*.txt"
mkdir
Creates a new directory.
Example: Create a directory named new_directory.
mkdir new_directory
rm
Removes files or directories. It’s a critical command for file management.
Example 1: Remove a file named example.txt.
rm example.txt
Example 2: Remove a directory and its contents (recursively).
rm -r directory_name
Warning: Be extremely cautious with rm -r, especially when used with . (current directory) or .. (parent directory), as this can lead to irreversible deletion of files. Never use rm -r . in a directory unless you are absolutely sure about deleting all its contents.
cp
Copies files and directories.
Example: Copy file1.txt to file2.txt.
cp file1.txt file2.txt
mv
Moves or renames files and directories.
Example: Rename oldname.txt to newname.txt.
mv oldname.txt newname.txt
for, do, done
A for loop in Bash allows you to iterate over a list of items, such as an array, a set of files, or even a range of numbers. Below, I will provide you with a few examples of how you can use a for loop in Bash.
Iterating over a list of strings
In this example, the for loop iterates over a list of strings and prints each one:
# List of items
items=("apple" "banana" "cherry")

# Loop through each item
for item in "${items[@]}"; do
    echo "Item: $item"
done
if, (else), then
The if statement in Bash scripting is used to execute a block of code conditionally based on whether an expression evaluates to true or false. Below are examples of how you can use an if statement in Bash:
filepath="/path/to/file.txt"

if [ -f "$filepath" ]; then
    echo "The file exists."
else
    echo "The file does not exist."
fi
alias
In Bash, an alias is a shortcut for a command. You can define an alias to simplify the execution of commonly used commands or to add default options to commands you frequently use. Here are some examples of how to create and use aliases in Bash:
Creating a simple alias
You can create an alias by using the alias command followed by the alias name and the command it represents. Here’s an example of a simple alias:
alias ll="ls -l"
Another commonly used alias is md as a shortcut for mkdir:
alias md="mkdir"
You can add these instructions to your .bashrc file in order to load them when logging in to the cluster.
Slurm commands
SLURM (Simple Linux Utility for Resource Management) is an open-source job scheduler used on many of the world’s supercomputers and compute clusters. It allows users to efficiently manage computing resources and queue their computational jobs for execution. Below are some essential SLURM commands with examples and brief explanations, helping users navigate and utilize these resources effectively. Remember to replace <jobid> with your specific job ID where necessary. These commands are vital tools for interacting with SLURM and managing your compute tasks effectively.
sinteractive
For requesting an interactive node, typically during testing phases. Compute resources such as memory, time, and GPUs are specified as part of the command, similar to sbatch directives.
Example: Request a 10-minute GPU node session.
sinteractive --time=00:10:00 --gres=gpu
sbatch
Used for submitting a script to SLURM for queuing in batch mode. The script includes directives at the top to specify required resources.
Example: Submit a job using a script named script.sh.
sbatch script.sh
squeue
Checks the status of jobs in the SLURM queue. Useful for tracking your job’s status and understanding the queue’s state, and to find a specific jobid of a particular job.
Example: Check the status of all your queued jobs.
squeue -u $USER
scancel
Cancels a job or all jobs of a user. Vital for managing jobs that are no longer needed or were submitted in error.
Example 1: Cancel a specific job with job ID <jobid>.
scancel <jobid>
Example 2: Cancel all jobs for the current user.
scancel -u $USER
slurmtop
A DAIC-specific command to view the top jobs in the queues and their resource usage.
Example:
slurmtop
scontrol
Shows detailed information and resources allocated to the job with the specified SLURM job ID.
Example: Show details of a job with job ID jobid.
scontrol show job <jobid>
sinfo
Displays information about SLURM nodes and partitions. Key command for understanding the state of the cluster.
Example: Display information about all nodes and partitions.
sinfo
sacct
Displays accounting data for all jobs and job steps. Useful for tracking resource usage and performance metrics. Example: Display accounting data for all jobs.
sacct --format=JobID,JobName%30,State,Elapsed,Timelimit,AllocNodes,Priority,Start,NodeList
Other
module
In the context of Unix-like operating systems, the module command is part of the environment modules system, a tool that provides a dynamic approach to managing the user environment. This system allows users to load and unload different software packages or environments on demand.
Basic Usage
Load a module:
module load module-nameThis command loads the specified module, setting up the environment variables and paths needed for the software package.
Unload a module:
module unload module-nameThis command unloads the specified module, removing any environment variables and paths associated with it.
For a more detailed description of module see Modules.