Slurm job’s terminology: job, job step, task and CPUs
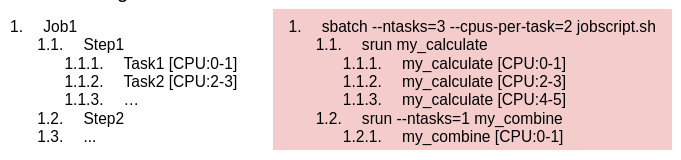
A slurm job (submitted via sbatch) can consists of multiple steps in series. Each step (specified via srun) can run multiple tasks (ie programs) in parallel. Each task gets its own set of CPUs. As an example, consider the workflow and corresponding breakdown shown in fig 2.
Slurm job’s terminology
In this example, note:
When you explicitly request 1 CPU per task (--cpus-per-task=1), you should also explicitly specify the number of tasks (--ntasks). Otherwise, srun may start the task twice in parallel (because CPUs are allocated in multiples of 2)
The default slurm allocation is a single task and single CPU (ie --ntasks=1 --cpus-per-task=1). Thus, it is not necessary to explicitly request these to run a single task on a single CPU.
When using multiple tasks, specify --mem-per-cpu.
Note
DAIC is dual-threaded. It means that CPUs are automatically allocated in multiples of 2. Thus, in your job use (a multiple of) 2 threads.
1 - Basics of Slurm jobs
How to submit jobs to the cluster?
Job script
Job scripts are text files, where the header set of directives that specify compute resources, and the remainder is the code that needs to run. All resources and scheduling are specified in the header as #SBATCH directives (see man sbatch for more information). Code could be a set of steps to run in series, or parallel tasks within these steps (see Slurm job’s terminology).
The code snippet below is a template script that can be customized to run jobs on DAIC.
A useful tool that can be used to streamline the debugging of such scripts is
ShellCheck
.
jobscript.sbatch
#!/bin/sh#SBATCH --partition=general # Request partition. Default is 'general' #SBATCH --qos=short # Request Quality of Service. Default is 'short' (maximum run time: 4 hours)#SBATCH --time=0:01:00 # Request run time (wall-clock). Default is 1 minute#SBATCH --ntasks=1 # Request number of parallel tasks per job. Default is 1#SBATCH --cpus-per-task=2 # Request number of CPUs (threads) per task. Default is 1 (note: CPUs are always allocated to jobs per 2).#SBATCH --mem=1024 # Request memory (MB) per node. Default is 1024MB (1GB). For multiple tasks, specify --mem-per-cpu instead#SBATCH --mail-type=END # Set mail type to 'END' to receive a mail when the job finishes. #SBATCH --output=slurm_%j.out # Set name of output log. %j is the Slurm jobId#SBATCH --error=slurm_%j.err # Set name of error log. %j is the Slurm jobId/usr/bin/scontrol show job -d "$SLURM_JOB_ID"# check sbatch directives are working#Remaining job commands go below here. For example, to run a Matlab script named "matlab_script.m", uncomment:#module use /opt/insy/modulefiles # Use DAIC INSY software collection#module load matlab/R2020b # Load Matlab 2020b version#srun matlab < matlab_script.m # Computations should be started with 'srun'.
Note
DAIC is dual-threaded. It means that CPUs are automatically allocated in multiples of 2. Thus, in your job use (a multiple of) 2 threads.
Do not enable mails when submitting large numbers (>20) of jobs at once
Job submission
To submit a job script jobscript.sbatch, login to DAIC, and:
To only test:
$ sbatch --test-only jobscript.sbatch
Job 1 to start at 2015-06-30T14:00:00 using 2 processors on nodes insy15 in partition general
To actually submit the job and do the computations:
$ sbatch jobscript.sbatch
Submitted batch job 2
Using GPU resources
Some DAIC nodes have GPUs of different types, that can be used for various compute purposes (see GPUs).
To request a gpu for a job, use the sbatch directive --gres=gpu[:type][:number], where the optional [:type] and [:number] specify the type and number of the GPUs requested, as in the examples below:
Slurm directives to request gpus for a job
Note
For CUDA programs, first, load the needed modules (CUDA, cuDNN) before running your code (see Available software).
An example batch script with GPU resources
#!/bin/sh
#SBATCH --partition=general # Request partition. Default is 'general' #SBATCH --qos=short # Request Quality of Service. Default is 'short' (maximum run time: 4 hours)#SBATCH --time=0:01:00 # Request run time (wall-clock). Default is 1 minute#SBATCH --ntasks=1 # Request number of parallel tasks per job. Default is 1#SBATCH --cpus-per-task=2 # Request number of CPUs (threads) per task. Default is 1 (note: CPUs are always allocated to jobs per 2).#SBATCH --mem=1024 # Request memory (MB) per node. Default is 1024MB (1GB). For multiple tasks, specify --mem-per-cpu instead#SBATCH --mail-type=END # Set mail type to 'END' to receive a mail when the job finishes. #SBATCH --output=slurm_%j.out # Set name of output log. %j is the Slurm jobId#SBATCH --error=slurm_%j.err # Set name of error log. %j is the Slurm jobId#SBATCH --gres=gpu:1 # Request 1 GPU# Measure GPU usage of your job (initialization)previous=$(/usr/bin/nvidia-smi --query-accounted-apps='gpu_utilization,mem_utilization,max_memory_usage,time' --format='csv'| /usr/bin/tail -n '+2')/usr/bin/nvidia-smi # Check sbatch settings are working (it should show the GPU that you requested)# Remaining job commands go below here. For example, to run python code that makes use of GPU resources:# Uncomment these lines and adapt them to load the software that your job requires#module use /opt/insy/modulefiles # Use DAIC INSY software collection#module load cuda/11.2 cudnn/11.2-8.1.1.33 # Load certain versions of cuda and cudnn #srun python my_program.py # Computations should be started with 'srun'. For example:# Measure GPU usage of your job (result)/usr/bin/nvidia-smi --query-accounted-apps='gpu_utilization,mem_utilization,max_memory_usage,time' --format='csv'| /usr/bin/grep -v -F "$previous"
Similarly, to interactively work in a GPU node:
$ hostname # check you are in one of the login nodeslogin1.daic.tudelft.nl
$
$ sinteractive --cpus-per-task=1 --mem=500 --time=00:01:00 --gres=gpu:v100:1
Note: interactive sessions are automatically terminated when they reach their time limit (1 hour)!
srun: job 8607665 queued and waiting for resources
srun: job 8607665 has been allocated resources
15:27:18 up 51 days, 3:04, 0 users, load average: 62,09, 59,43, 44,04
SomeNetID@insy11:~$
SomeNetID@insy11:~$ hostname # check you are in one of the compute nodesinsy11.daic.tudelft.nl
SomeNetID@insy11:~$
SomeNetID@insy11:~$ nvidia-smi # check characteristics of GPUMon Jul 24 15:37:01 2023+---------------------------------------------------------------------------------------+
| NVIDIA-SMI 530.30.02 Driver Version: 530.30.02 CUDA Version: 12.1 ||-----------------------------------------+----------------------+----------------------+
| GPU Name Persistence-M| Bus-Id Disp.A | Volatile Uncorr. ECC || Fan Temp Perf Pwr:Usage/Cap| Memory-Usage | GPU-Util Compute M. |||| MIG M. ||=========================================+======================+======================||0 Tesla V100-SXM2-32GB On | 00000000:88:00.0 Off |0|| N/A 32C P0 40W / 300W| 0MiB / 32768MiB | 0% Default |||| N/A |+-----------------------------------------+----------------------+----------------------+
+---------------------------------------------------------------------------------------+
| Processes: || GPU GI CI PID Type Process name GPU Memory || ID ID Usage ||=======================================================================================|| No running processes found |+---------------------------------------------------------------------------------------+
SomeNetID@insy11:~$
SomeNetID@insy11:~$ exit# exit the interactive session
Note
To inspect a given GPU and obtain its details, you can run the following commands on an interactive session or an sbatch script.
$ sinteractive --cpus-per-task=2 --mem=500 --time=00:02:00 --gres=gpu
Note: interactive sessions are automatically terminated when they reach their time limit (1 hour)!
srun: job 8607783 queued and waiting for resources
srun: job 8607783 has been allocated resources
15:50:29 up 51 days, 3:26, 0 users, load average: 60,33, 59,72, 54,65
SomeNetID@influ1:~$ nvidia-smi --format=csv,noheader --query-gpu=name
NVIDIA GeForce RTX 2080 Ti
SomeNetID@influ1:~$ nvidia-smi -q | grep Architecture
Product Architecture : Turing
SomeNetID@influ1:~$ nvidia-smi --query-gpu=compute_cap --format=csv,noheader
7.5
SomeNetID@influ1:~$ apptainer run --nv cuda_based_image.sif | grep "CUDA Cores"# using the apptainer image of the tutorial(068) Multiprocessors, (064) CUDA Cores/MP: 4352 CUDA Cores
SomeNetID@influ1:~$ nvidia-smi --format=csv,noheader --query-gpu=memory.total
11264 MiB
SomeNetID@influ1:~$ exit
Interactive jobs on compute nodes
To work interactively on a node, e.g., to debug a running code, or test on a GPU, start an interactive session using sinteractve <compute requirements>. If no parameters were provided, the default are applied. <compute requirement> can be specified the same way as sbatch directives within an sbatch script (see Submitting jobs), as in the examples below:
$ hostname # check you are in one of the login nodeslogin1.daic.tudelft.nl
$ sinteractive
16:07:20 up 12 days, 4:09, 2 users, load average: 7.06, 7.04, 7.12
$ hostname # check you are in a compute nodeinsy15
$ squeue -u SomeNetID # Replace SomeNetId with your NetID JOBID PARTITION NAME USER ST TIME NODES NODELIST(REASON)2 general bash SomeNetI R 1:23 1 insy15
$ logout# exit the interactive job
To request a node with certain compute requirements:
When you logout from an interactive session, all running processes will be terminated
Note
Requesting interactive sessions is subject to the same resource availability constraints as submitting an sbatch script. It means you may need to wait until resources are available as you would when you submit an sbatch script
Monitoring slurm jobs
To check your job has actually been submitted:
$ squeue -u SomeNetID # Replace SomeNetId with your NetID JOBID PARTITION NAME USER ST TIME NODES NODELIST(REASON)2 general jobscip SomeNetI R 0:01 1 insy15
And to check the log of your job, use an editor or viewer of choice (eg, vi, nano or simply cat) to view the log:
Sometimes, it may be desirable to inspect slurm jobs beyond their status in the queue. For example, to check which script was submitted, or how the resources were requested and allocated. Below are a few useful commands for this purpose:
In SLURM, a partition is a scheduling construct that groups nodes or resources based on certain characteristics or policies. Partitions are used to organize and manage resources within a cluster, and they allow system administrators to control how jobs are allocated and executed on different nodes.
To see all paritions on DAIC, you can use the command scontrol show partition -a. To check owners of these partitions, check the Contributing departments page.
Partitions & priority tiers
DAIC partitions are tiered:
The general partition is in the lowest priority tier,
Department partitions (eg, insy, st) are in the middle priority tier, and
Partitions for specific groups (eg, influence, mmll) are in the highest priority tier. Those partitions correspond to resources contributed by the respective groups or departments (see Contributing departments).
When resources become available, the scheduler will first look for jobs in the highest priority partition that those resources are in, and start the highest (user) priority jobs that fit within the resources (if any). When resources remain, the scheduler will check the next lower priority tier, and so on. Finally, the scheduler will try to backfill lower (user) priority jobs that fit (if any).
The partition priorities have no impact on resources that are in use, so jobs have to wait until the resources become available.
Partition selection
The purpose of this tiering is to let you submit your jobs to multiple partitions (e.g., --partition=mml,insy,general), allowing the scheduler to determine where the job can start the soonest. This ensures your job has the highest possible priority across different partitions in the cluster, without negatively impacting your or others’ resource access.
Keep in mind that:
Resources of all partitions (eg, st) are also part of the general partition (see Fig 1). Thus:
Submitting to the general partition allows jobs to use all nodes
Submitting to group-specific partitions alone results in longer waiting times, since the general partition has much more resources than any of them (The bigger the resource pool, the more chances a job has to be scheduled or back-filled)
The optimal strategy is to submit to bothgeneral and group-specific partitions when accessible. This is to skip over higher-priority jobs that would otherwise get started first on resources that are also in the specific partition.
You should only submit jobs to partitions that your account has access to. Submitting jobs to unauthorized partitions (e.g., using --partition=insy,st when your submitting account does not have access to both of these) will result in the job remaining in a pending state and generate excessive logging, potentially overloading the Slurm controller nodes.
Warning
Always ensure you are submitting jobs to partitions accessible by your account. You can check your account and partition permissions with the following commands- example output for a user is shown below:
$ sacctmgr show user "$USER" withassoc Format='DefaultAccount,Account' --parsable # Check your account(s)Def Acct|Account|
ewi-insy-prb|ewi-st|
ewi-insy-prb|ewi-insy-prb|
$echo"Partition AllowAccounts"; scontrol show partition -a |\
> awk '> /PartitionName=/ {> split($1, a, "=");>partition= a[2]>}> /AllowAccounts=/ {> split($2, b, "=");> print partition, b[2]>}>'|\
> grep -E 'ALL|ewi-insy-prb'# Check paritions accessible to your *default* accountPartition AllowAccounts
general ALL
insy ewi-insy,ewi-insy-cgv,ewi-insy-cys,ewi-insy-ii,ewi-insy-ii-influence,ewi-insy-mmc,ewi-insy-prb,ewi-insy-prb-dbl,ewi-insy-prb-prlab,ewi-insy-prb-spclab,ewi-insy-prb-visionlab,ewi-insy-reit,ewi-insy-sdm,ewi-insy-sup
This shows that the user can use the ewi-insy-prb or the ewi-st accounts.
The second command shows that all accounts can submit to the general partition and several accounts can submit to the insy partition.
Replace the ewi-insy-prb in the grep line above to get the partition details for your specific account.
For the example above note the following correct and incorrect examples:
Correct: explicit default account and partition specification
Incorrect: Specifying a wrong account for the partition
#SBATCH --account=ewi-st#SBATCH --partition=insy
Consequences: Submitting jobs to unauthorized partitions may result in jobs remaining pending and could overload the system, leading to potential job cancellations without warning.
Priority calculations
Slurm continually calculates job priorities and schedules the execution of jobs based on its configurations. A few configuration parameters affect priority computations:
SchedulerType: The type of scheduling used based on available resources, requested resources, and job priorities. On DAIC, slurm is used with backfill scheduling mechanism. This mechanism allows low priority jobs to backfill idle resources if doing so does not delay the expected start time of any high priority job (based on resource availability).
Tip
With sched/backfil, jobs can only be started when the resources that they request fit within the available idle resources. Thus:
The fewer resources a job request, the higher the chance that it will fit within the available idle resources.
The more resources a job request, the long it will have to wait before enough resources become available to start.
To check how the cluster is configured, you may run:
$ scontrol show config | grep SchedulerType
SchedulerType= sched/backfil
PriorityType: The way priority is computed. On DAIC, a multifactor computation is applied, where job priority at any given time is a weighted sum of the following factors:
Fairshare: a measure of the amount of resources that a group (ie account in slurm terminology) has contributed, and the historical usage of the group and the user.
QOS: the quality of service associated with the job, which is specified with the slurm --qos directive (see QoS priority).
Info
The whole idea behind the FairShare scheduling in DAIC is to share all the available resources fairly and efficiently with all users (instead of having strict limitations in the amount of resource use or in which hardware users can compute). The resources in the cluster are contributed in different amounts by different groups (see Contributing departments), and the scheduler makes sure that each group can use a share of the resource relative to what the group contributed.
To check how the cluster is configured you may run:
$ scontrol show config | grep PriorityType
PriorityType= priority/multifactor
$ sprio --weights
JOBID PARTITION PRIORITY SITE FAIRSHARE QOS
Weights 12000000040000000
The following commands are useful for checking prioritization of your own jobs:
Command
Purpose
sprio -j <YourJobID>
Determine the priority of your job
squeue -j <YourJobID> --start
Request your job’s estimated start time
sshare -u <YourNetID>
Determine your current fairshare value
Info
To get more complete priority configurations of a cluster, run the command:
$ scontrol show config | grep ^Priority
PriorityParameters=(null)PrioritySiteFactorParameters=(null)PrioritySiteFactorPlugin=(null)PriorityDecayHalfLife= 2-00:00:00
PriorityCalcPeriod= 00:05:00
PriorityFavorSmall= No
PriorityFlags=PriorityMaxAge= 7-00:00:00
PriorityUsageResetPeriod= NONE
PriorityType= priority/multifactor
PriorityWeightAge=0PriorityWeightAssoc=0PriorityWeightFairShare=20000000PriorityWeightJobSize=0PriorityWeightPartition=0PriorityWeightQOS=40000000PriorityWeightTRES=(null)
Quality of Service (QoS)
When you submit a job in a slurm-based system, it enters a queue waiting for resources.
The partition and Quality of Service(QoS) are the two job parameters slurm uses to assign resources for a job:
The partition is a set of compute nodes on which a job can be scheduled. In DAIC, the nodes contributed or funded by a certain group are lumped into a corresponding partition (see Contributing departments).
All nodes in DAIC are part of the general partition, but other partitions exist for prioritization purposes on select nodes (see Priority tiers).
The Quality of Service is a set of limits that controls what resources a job can use and, therefore, determines the priority level of a job. This includes the run time, CPU, GPU and memory limits on the given partition. Jobs that exceed these limits are automatically terminated (see QoS priority).
For DAIC, Table 1 shows the QoS limits on the general partition.
Table 1: The general partition and its operational and per-QoS per-user limits; specific groups use other partitions and QoS
*infinite QoS jobs will be killed when servers go down, eg, during maintenance. It is not recommended to submit jobs with this QoS.
Partition
QoS
Priority
Max run time
Jobs per user
CPU limits
GPU limits
Memory limits
Per QoS
Per user
Per QoS
Per user
Per QoS
Per User
general
interactive
high
1 hour
1 running
-
2
-
2
-
16G
short
normal
4 hours
10000
3672 (85%)
2160 (50%)
109 (85%)
64 (50%)
23159G (85%)
13623G (50%)
medium
medium
1 ½ day
2000
3456 (80%)
1512 (35%)
103 (80%)
45 (35%)
21796G (80%)
9536G (35%)
long
low
7 days
1000
3240 (75%)
864 (20%)
96 (75%)
25 (20%)
20434G (75%)
5449G (20%)
infinite*
none
infinite
1 running
32
-
2
-
250G
-
Note
The priority of a job is a function of both QoS and previous usage (less is better).
Read Priority and waiting times for more information.
See Quality of Service definitions
On DAIC you can check the QoS policies with the sacctmgr command:
In your sbatch.slurm script you can specify the QoS with #SBATCH --qos=... option.
Example:
#!/bin/bash
#SBATCH --job-name=hello-world#SBATCH --partition=general#SBATCH --account=ewi-insy-reit#SBATCH --qos=short # This is how you specify QoS#SBATCH --time=0:01:00 #SBATCH --nodes=1 #SBATCH --tasks-per-node=1 #SBATCH --cpus-per-task=2 #SBATCH --mem=1GB #SBATCH --output=slurm-%n-%j.out #SBATCH --error=slurm-%n-%j.errsrun echo'Hi, from Slurm!'sleep 30# Wait for 30 seconds before exiting.
QoS priority
The purpose of the (multiple) QoSs in DAIC is to optimize the throughput of the cluster and to reduce the waiting times for jobs:
Long jobs block resources for a long time, thus leading to long waiting times and fragmentation of resources.
Short jobs block resources only for short times, and can more easily fill in the gaps in the scheduling of resources (thus start sooner), and are therefore better for throughput and waiting times.
Thus, DAIC has the following policy:
To stimulate short jobs, the short QoS has a higher priority, and allows you to use a larger part of all resources, than the medium and long QoS.
To prevent long jobs from blocking all resources in the cluster for long times (thus causing long waiting times), only a certain part of all cluster resources is available to all running long QoS jobs (of all users) combined.
All running medium QoS jobs together can use a somewhat larger part of all resources in the cluster, and all running short QoS jobs combined are allowed to fill the biggest part of the cluster.
These limits are called the QoS group limits.
When this limit is reached, no new jobs with this QoS can be started, until some of the running jobs with this QoS finish and release some resources.
The scheduler will indicate this with the reason QoS Group CPU/memory/GRES limit.
To prevent one user from single-handedly using all available resources in a certain QoS, there are also limits for the total resources that all running jobs of one user in a specific QoS can use.
These are called the QoS per-user limits.
When this limit is reached, no new jobs of this user with this QoS can be started, until some of the running jobs of this user and with this QoS finish and release some resources.
The scheduler will indicate this with the reason QoS User CPU/memory/GRES limit.
These per-group and per-user limits are set by the DAIC user board, and the scheduler strictly enforces these limits. Thus, no user can use more resources than the amount that was set by the user board. Any (perceived) imbalance in the use of resources by a certain QoS or user should not be held against a user or the scheduler, but should be discussed in the user board.
Resources reservations
Slurm gives the possibility to reserve one or more compute nodes exclusively for a specific user or group of users. A reservation ensures that the designated node (or nodes) are dedicated solely to the reservation holder’s tasks and are not shared with other users during the reserved period. This feature allows users to plan the execution of future workloads, and accommodates cluster users with special needs beyond the batch system (eg latency measurement scenarios).
Note
Using reservations is in line with the General cluster usage clauses of DAIC users’ agreement. However, please be mindful that reservations are intended to facilitate special needs that cannot be satisfied by the batch system, and should not be requested to guarantee fast throughput for production runs.
Requesting a Reservation
To request a reservation for nodes, please use to the
Request Reservation form.
You can request a reservation for an entire compute node (or a group of nodes) if you have contributed this (or these) nodes to the cluster and you have special needs that needs to be accommodated.
General guidelines for reservations’ requests:
You can be granted a reservation only on nodes from a partition that is contributed by your group (See Computing nodes for a listing of available nodes, their features, and which paritions they belong to).
Please ask for the least amount of resources you need as to minimize impact on other users.
Plan ahead and request your reservation as soon as possible: Reservations usually ignore running jobs, so any running job on the machine(s) you request will continue to run when the reservation starts. While jobs from other users will not start on the reserved node(s), the resources in use by an already running job at the start time of the reservation will not be available in the reservation until this running job ends. The earlier ahead you request resources, the easier it is to allocate the requested resources.
Using reservations
Once your reservation request is approved and a reservation is placed on the system, you can run your jobs in the reservation by specifying --qos=reservation along with the following directives to your slurm commands: --reservation=<name> and --partition=<partition>. For example, to submit the job job.sbatch to a reservation named icra_iv on the cor1 node on the cor partition use:
It is possible to submit jobs to a reservation once it is created. Jobs will start immediately when the reservation is available, but already running jobs on resources will not be canceled for the reservation to start.
Note
When a reservation is used to run your jobs, remember to also pass the reservation parameters to your srun steps:
Only jobs from the Users or Accounts associated with the reservation (as shown in the scontrol show reservations output) will be run on the reservation
STATE of a reservation will show as ACTIVE (instead of INACTIVE) during the reservation window.
3 - Advanced Slurm jobs
How to submit jobs to slurm?
Parallelizing jobs with Job Arrays
There can be scenarios, eg in simulations or benchmarking, where a job script needs to run many times with only different parameter set each time. If done manually, keeping track of the parameter values and corresponding jobIds is cumbersome. Job Arrays are a convenient mechanism for submitting and managing such jobs.
A job array is created by adding the --array=<indexes> directive to an sbatch script (or in the command line), where <indexes> can be either a comma separated list of integers, or a range with optional step size, eg, 1-10:2. The minimum index value is 0, and the maximum is a Slurm configuration parameter (MaxArraySize - 1).
Within a job array, all jobs have the same SLURM_ARRAY_JOB_ID, but each job will have its own environment variable SLURM_ARRAY_TASK_ID that corresponds to the array index value. Additionally, all jobs in the array inherit the same compute resources requirements. In the following examples, arrays of size 2 are created, but with different indexes:
$ sbatch --array=1,4 jobscript.sbatch # Indexes specified as a list, and have values 1 and 4Submitted batch job 8580151$
$ squeue -u SomeNetID # Replace SomeNetId with your NetID JOBID PARTITION NAME USER ST TIME NODES NODELIST(REASON) 8580151_1 general jobscrip SomeNetID R 0:01 1 grs4
8580151_4 general jobscrip SomeNetID R 0:01 1 awi18
$ sbatch --array=1-2 jobscript.sbatch # Range specified with default step size = 1. Index have values 1 and 2Submitted batch job 8580149$
$ squeue -u SomeNetID # Replace SomeNetId with your NetID JOBID PARTITION NAME USER ST TIME NODES NODELIST(REASON) 8580149_1 general jobscrip SomeNetID R 0:21 1 grs4
8580149_2 general jobscrip SomeNetID R 0:21 1 awi18
Note
To limit the maximum number of simultaneously running jobs in an array use the % separator, eg--array=1-15%3 to run only 3 tasks at a time.
JobId and environment variables
As shown in the previous section, Parallelizing jobs with job arrays, jobs within an array are assigned special slurm variables. These variables can be exploited for various computational objectives. Among these, SLURM_ARRAY_TASK_ID is the index of an individual task within the array, and SLURM_ARRAY_JOB_ID is the slurm jobId of the entire array job.
In the simplest case, you can use the ${SLURM_ARRAY_TASK_ID} directly in a script to assign parameter values. For example, to run a workflow across a set of images image_1.png … image_5.png, you can simply create an array using the sbatch directive --array=1-5, and then, within your sbatch script, use image_${SLURM_ARRAY_TASK_ID}.png to indicate the corresponding image.
In more complex scenarios, eg, when the parameters of interest are not mappable to indexes (of a job array), you can use a config file to map the parameters to the job array indexes. For example, let’s assume the following parameters:
$ cat jobarray.config
i       Flower  Color   Origin
1       Rose    Red     Worldwide
2       Jasmine  White   Asia
3       Tulip   Various Persia&Turkey
4       Orchid  Various Worldwide
5       Lily    Various Worldwide
Now, you can use these parameters inside a job script as follows:
$ cat jobarray.sbatch
#!/bin/bash#SBATCH --job-name=JobArrayExample#SBATCH --ntasks=1#SBATCH --cpus-per-task=1#SBATCH --array=1-5 # Arry with 5 tasks#SBATCH --output=slurm-%A_%a.out # Set name of output log. %A is SLURM_ARRAY_JOB_ID and %a is SLURM_ARRAY_TASK_ID#SBATCH --error=slurm-%A_%a.err # Set name of error log. %A is SLURM_ARRAY_JOB_ID and %a is SLURM_ARRAY_TASK_IDconfig=jobarray.config # Path to config file# Obtain parameters from config file:flower=$(awk -v ArrayTaskID=$SLURM_ARRAY_TASK_ID'$1==ArrayTaskID {print $2}'$config)color=$(awk -v ArrayTaskID=$SLURM_ARRAY_TASK_ID'$1==ArrayTaskID {print $3}'$config)origin=$(awk -v ArrayTaskID=$SLURM_ARRAY_TASK_ID'$1==ArrayTaskID {print $4}'$config)# Use the parameters, eg, print the index and parameter values to a file:echo"Array task: ${SLURM_ARRAY_TASK_ID}, Flower: ${flower}, color: ${color}, origin: ${origin}" >> output.txt
$
$ sbatch jobArray.sbatch
Submitted batch job 8580317$ squeue -u SomeNetID # Replace SomeNetId with your NetID JOBID PARTITION NAME USER ST TIME NODES NODELIST(REASON) 8580317_[1-5] general JobArray SomeNetID PD 0:00 1(Priority)
In this example, slurm created 5 jobs in a job array, each using the same settings (the name JobArrayExample, the general partition, short QoS, 00:01:00 time, 1 task with 1 CPU and 1G memory, and an output and error file with both array job Id and task id). Each task looks up certain parameter values from a config file leveraging its index via the awk command.
assigns a value to the variable flower by reading a configuration file ($config), and printing the value in the second column ({print $2}) where the first column matches the value of the ArrayTaskID variable ($1==ArrayTaskID). The ArrayTaskID is an awk variable set to the value of the SLURM environment variable SLURM_ARRAY_TASK_ID.
For more on the awk utility, see this awk tutorial.
Jobs within a task array are run in parallel, and hence, there’s no guarantee about their order of execution. This is evident looking at the output file from this example:
Other slurm variables that are set inside a job array are shown in the following table, with values based on the preceding example:
Slurm Environment Variable
Description
Value in example
SLURM_ARRAY_JOB_ID
The first job ID of the array.
8580317
SLURM_ARRAY_TASK_ID
The job array index value.
A value in range 1-5
SLURM_ARRAY_TASK_COUNT
The number of tasks in the job array.
5
SLURM_ARRAY_TASK_MAX
The highest job array index value.
5
SLURM_ARRAY_TASK_MIN
The lowest job array index value
1
Slurm commands and job arrays
The squeue command reports all submitted jobs. By default, squeue reports all of the tasks associated with a job array in one line and uses a regular expression to indicate the SLURM_ARRAY_TASK_ID values. To explicitly print one job array element per line, use the --array or -r flag. The following examples highlight the difference, using the same jobarray.sbatch file from the JobId and environment variables section:
$ sbatch jobarray.sbatch
Submitted batch job 8593299$
$ squeue -u SomeNetID # Replace SomeNetId with your NetID JOBID PARTITION NAME USER ST TIME NODES NODELIST(REASON) 8593299_[1-5] general JobArray SomeNetID PD 0:00 1(Priority)$
$ squeue -r -u SomeNetID # Replace SomeNetId with your NetID JOBID PARTITION NAME USER ST TIME NODES NODELIST(REASON) 8593299_1 general JobArray SomeNetID PD 0:00 1(Priority) 8593299_2 general JobArray SomeNetID PD 0:00 1(Priority) 8593299_3 general JobArray SomeNetID PD 0:00 1(Priority) 8593299_4 general JobArray SomeNetID PD 0:00 1(Priority) 8593299_5 general JobArray SomeNetID PD 0:00 1(Priority)
scancel, on the other hand, can be used to cancel an entire job array by specifying its SLURM_ARRAY_JOB_ID. Alternatively, to cancel a specific task (or tasks), both its SLURM_ARRAY_JOB_ID and SLURM_ARRAY_TASK_ID must be specified, possibly with a regular expression, as shown in the following examples:
$ sbatch jobarray.sbatch
$ squeue -u SomeNetID # Replace SomeNetId with your NetID JOBID PARTITION NAME USER ST TIME NODES NODELIST(REASON) 8593321_[1-5] general JobArray SomeNetID PD 0:00 1(Priority)$
$ scancel 8593321_4 # Cancel task with index 4 in the array$ squeue -u SomeNetID # Replace SomeNetId with your NetID JOBID PARTITION NAME USER ST TIME NODES NODELIST(REASON) 8593321_[1-3,5] general JobArray SomeNetID PD 0:00 1(Priority)$
$ scancel 8593321_[1-3]# Cancel tasks in index range 1-3 in the array$ squeue -u SomeNetID # Replace SomeNetId with your NetID JOBID PARTITION NAME USER ST TIME NODES NODELIST(REASON) 8593321_5 general JobArray SomeNetID PD 0:00 1(Priority)$
$ scancel 8593321# Cancel all tasks in the array$ squeue -u SomeNetID # Replace SomeNetId with your NetID JOBID PARTITION NAME USER ST TIME NODES NODELIST(REASON)$
In certain scenarios, it might be desirable to condition the execution of a certain job on the status of another job. In such cases, the sbatch directive --dependency=<condition>:<jobID> can be used, where <condition> specifies the type of dependency (See table 2), and <jobID> is the slurm jobID upon which dependency is based. To specify more than one dependency, the , separator is used to indicate that all dependencies must be specified, and, ? is used denotes that any dependency may be satisfied.
For example, assume the slurm job scripts, job_1.sbatch, … job_3.sbatch need to run sequentially one after the other. To start this chain, submit the first job and obtain its jobID:
$ sbatch job_1.sbatch
Submitted batch job 8580135
Next, submit the second job to run only if the first job is successful:
Note that if the first job (with jobID 8580135 in the example) fails, the second job (with jobID 8580136) will not run, but it will remain in the queue. You have to use scancel 8580136 to cancel this job
And, now, to run the third job only after the first two jobs have both run successfully:
If the jobs within a chain involve copying data files to a local disk (/tmp) on a node, you need to make sure all jobs use the same node (--nodelist=<node>, for example --nodelist=insy15)
Table 2: Possible sbatch dependency conditions
Argument
Description
after
This job can begin execution after the specified jobs have begun execution
afterany
This job can begin execution after the specified jobs have terminated.
aftercorr
A task of this job array can begin execution after the corresponding task ID in the specified job has completed successfully
afternotok
This job can begin execution after the specified jobs have terminated in some failed state
afterok
This job can begin execution after the specified jobs have successfully executed
singleton
This job can begin execution after any previously launched jobs sharing the same job name and user have terminated
Kerberos is an authentication protocol which uses tickets to authenticate users (and computers). You automatically get a ticket when you log in with your password on a TU Delft installed computer. You can use this ticket to authenticate yourself without password when connecting to other computers or accessing your files. To protect you from misuse, the ticket expires after 10 hours or less (even when you’re still logged in).
File access
Your Linux and Windows Home directories and the Group and Project shares are located on network fileservers, which allows you to access your files from all TU Delft installed computers. Kerberos authentication is used to enable access to, or protect, your files. Without a valid Kerberos ticket (e.g. when the ticket has expired) you will not be able to access your files but instead you will receive a Permission denied error.
Lifetime of Kerberos Tickets
Kerberos tickets have a limited valid lifetime (of up to 10 hours) to reduce the risk of abuse, even when you stay logged in. If your tickets expire, you will receive a Permission Denied error when you try to access your files and a password prompt when you try to connect to another computer. When you want your program to be able to access your files for longer than the valid ticket lifetime, you’ll have to renew your ticket (repeatedly) until your program is done. Kerberos tickets can be renewed up to a maximum renewable life period of 7 days (again to reduce the risk of abuse).
The command klist -5 lists your cached Kerberos tickets together with their expiration time and maximum renewal time:
$ klist -5
Ticket cache: FILE:/tmp/krb5cc_uid_random
Default principal: YourNetID@TUDELFT.NET

Valid starting     Expires            Service principal
01/01/01 00:00:00  01/01/01 10:00:00  krbtgt/TUDELFT.NET@TUDELFT.NET
        renew until 01/08/01 00:00:00
Where:
Ticket cache: The Kerberos tickets that have been issued to you are stored in a ticket cache file. You can have multiple ticket cache files on the same computer (from different connections, for example) with different tickets and ticket expiration times. Some ticket cache files are automatically removed when you logout.
Tip
Make sure that you renew the tickets in the right ticket cache file (see this screen example).
Default principal: Your identity.
Service principal: The identity of services that you have gotten tickets for. You always need a Kerberos ticket-granting ticket (krbtgt) in order to obtain other tickets for specific services like accessing files (nfs) or connecting to computers (host).
Valid starting, Expires: Your ticket is only valid between these times (this period is called the valid lifetime). After this time you will not be able to use the service nor automatically renew the ticket (without password).
Renew until: Your ticket can only be renewed without password up to this time. After this time you will have to obtain a new ticket using your password.
Renewing Kerberos tickets
If you have a valid Kerberos krbtgt ticket, you can renew it at any time (until it expires) by running the command kinit -R:
$ kinit -R
$ klist -5
Ticket cache: FILE:/tmp/krb5cc_uid_random
Default principal: YourNetID@TUDELFT.NET

Valid starting     Expires            Service principal
01/01/01 01:00:00  01/01/01 11:00:00  krbtgt/TUDELFT.NET@TUDELFT.NET
        renew until 01/08/01 00:00:00
Note
Renewing the ticket will not change the duration of the valid lifetime, i.e. a krbtgt ticket with a valid lifetime of 1 hour will, after renewal, be valid for another hour.
When the krbtgt ticket has expired or reached it’s renew until time, you will have to obtain a new ticket by running kinit -r 7d (note the difference in case for the r) and authenticating with your password:
$ kinit -r 7d
Password for YourNetID@TUDELFT.NET:
$ klist -5
Ticket cache: FILE:/tmp/krb5cc_uid_random
Default principal: YourNetID@TUDELFT.NET

Valid starting     Expires            Service principal
01/01/01 11:00:00  01/01/01 21:00:00  krbtgt/TUDELFT.NET@TUDELFT.NET
        renew until 01/08/01 11:00:00
The new ticket will have a valid lifetime of 10 hours and a renewable life of 7 days.
On the TU Delft Linux desktops your Kerberos ticket is refreshed (i.e. replaced by a new ticket) automatically every time you enter your password for unlocking the screen saver.
Tip
Do not disable the screen saver password lock.
On remote computers you have to manually renew your tickets before they expire.
Slurm & Kerberos
Slurm caches your Kerberos ticket, and uses it to execute your job
Regularly renew the ticket in Slurm’s cache while your jobs are queued or running:
$ auks -a
Auks API request succeed
To automatically renew your ticket in Slurm’s cache until you change your NetID password, run the following on the login1 node:
$ install_keytab
Password for somebody@TUDELFT.NET:
Installed keytab.
You need to rerun this command whenever you change your NetID password (at least every 6 months). Otherwise, the automatic renewal will not work and you will receive a warning e-mail.
Renewal using screen
On the compute nodes, the screen program has been modified to allow jobs to run unattended for up to 7 days. It creates a private ticket cache (to prevent the cache from being destroyed at logout) and automatically renews your ticket up to the maximum renewable life. For example, start MATLAB in Screen with screen matlab (the order is important!).
$ screen matlab
Warning: No display specified.  You will not be able to display graphics on the screen.

                           < M A T L A B (R) >
                 Copyright 1984-2010 The MathWorks, Inc.
              Version 7.11.0.584 (R2010b) 64-bit (glnxa64)
                             August 16, 2010


  To get started, type one of these: helpwin, helpdesk, or demo.
  For product information, visit www.mathworks.com.

>>
For longer jobs you have to manually obtain a new ticket at least every 7 days by running kinit -r 7dfrom within screen (so you use the specific ticket cache file that screen is using):
connect to screen (screen -r),
create a new window (Ctrl-a c),
run kinit -r 7d,
exit the window (exit) and
detach from screen (Ctrl-a d).
$ kinit -r 7d
Password for YourNetID@TUDELFT.NET:
$ klist -5
Ticket cache: FILE:/tmp/krb5cc_uid_private
Default principal: YourNetID@TUDELFT.NET

Valid starting     Expires            Service principal
01/08/01 09:00:00  01/08/01 19:00:00  krbtgt/TUDELFT.NET@TUDELFT.NET
        renew until 01/15/01 09:00:00
$ exit
Tip
Use a repeating reminder (twice a week) in your agenda so you don’t forget.
Important
When the end of the renewable life is reached, your tickets expire and your program(s) will return Permission denied errors when trying to access your files. Your program(s) will not be terminated automatically; you still have to terminate the program(s) yourself.
Extra functionality can be provided by the k5start and krenew programs. On most computers these are not available by default but can be installed.