Apptainer tutorial
17 minute read
What you’ll learn
- Understand why containers are useful for HPC workloads
- Pull prebuilt images from Docker Hub and NVIDIA NGC
- Build custom container images from definition files
- Run containerized applications on DAIC with GPU support
- Manage bind mounts and cache directories
Prerequisites: Slurm Basics (submitting jobs, requesting GPUs)
Time: 45 minutes
What and Why containerization?
Containerization packages your software, libraries, and dependencies into a single portable unit: a container. This makes your application behave the same way everywhere: on your laptop, in the cloud, or on DAIC. This means:
- Consistency: The application runs the same way regardless of where it’s executed. You can develop on one machine, test on another, and deploy on a cluster without worrying about dependency differences.
- Isolation: Each container is independent from others, preventing conflicts and enhancing security and reliability.
- Portability: Containers can run on different systems without modification, simplifying movement between servers, clusters, or clouds.
- Efficiency: Containers share the host system’s resources like the operating system, making them lightweight and fast to start compared to virtual machines.
On DAIC specifically, users often encounter issues with limited home directory space or Windows-based /tudelft.net mounts (see Storage), which can complicate the use of conda/mamba and/or pip. Containers offer a solution by encapsulating all software and dependencies in a self-contained environment. You can, for instance, store containers on staff-umbrella with all required dependencies, including those installed via pip, and run them reliably and reproducibly without being limited by home directory size or mount compatibility.
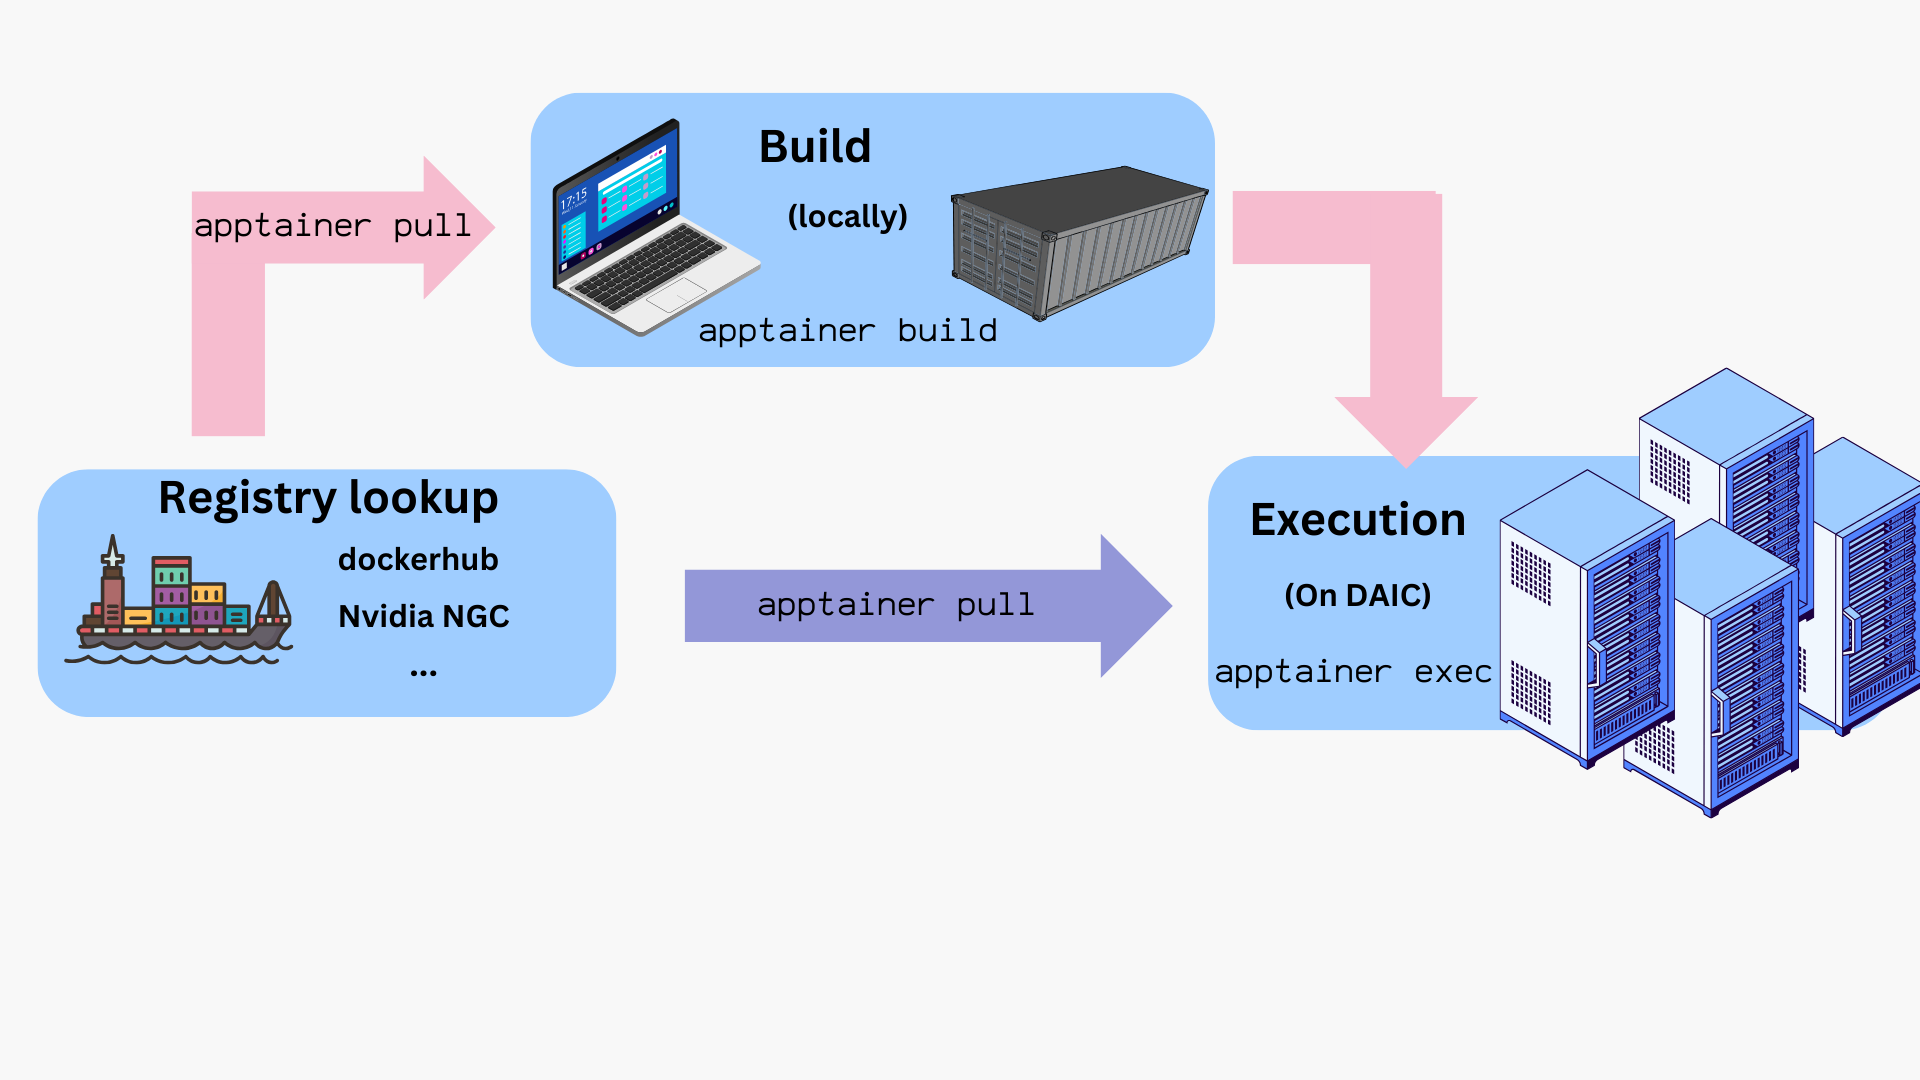
Containerization on DAIC: Apptainer
DAIC supports Apptainer (formerly known as Singularity), an open-source container platform designed for high-performance computing environments. Apptainer runs container images securely on shared clusters and allows you to use Docker images directly, without needing Docker itself.
A typical Apptainer workflow revolves around three key components:
| Component | Description |
|---|---|
Definition file (*.def) | A recipe describing how to build the container: which base image to use and which packages to install. |
Image (*.sif) | A single portable file containing the full environment: operating system, libraries, and applications. |
| Container | A running instance of an image, with its own writable workspace for temporary files or intermediate data. |
Because Apptainer integrates well with Slurm, containers can be launched directly within batch jobs or interactive sessions on DAIC.
The following sections show how to obtain, build, and run images.
Workflow overview
The typical lifecycle for containers on DAIC is:
- Build the image locally from a
.deffile. - Transfer or pull the resulting
.siffile onto DAIC. - Test interactively using
sallocto get a compute node. - Run in a batch job with
sbatchorsrunusingapptainer execorapptainer run. - Provision bind mounts, GPU flags, and cache locations as needed.
- Clean up and manage storage (e.g.,
APPTAINER_CACHEDIR).
How to run commands/programs inside a container?
Once you have a container image (e.g., myimage.sif), you can launch it in different ways depending on how you want to interact with it:
| Command | Description | Example |
|---|---|---|
apptainer shell <image> | Start an interactive shell inside the container. | apptainer shell myimage.sif |
apptainer exec <image> <command> | Run the <command> inside the container, then exit. | apptainer exec myimage.sif python --version |
apptainer run <image> | Execute the container’s default entrypoint (defined in its recipe). | apptainer run myimage.sif |
where:
<image>is the path to a container image, typically, a*.siffile.
Tips:
- Use
shellfor exploration or debugging inside the container. - Use
execorrunfor automation, workflows, or Slurm batch jobs. - Add
-Cor-cto isolate the container filesystem (see Exposing host directories).
Tip: Test interactively before submitting jobs
For containers that need GPUs or large memory, start an interactive session first:
$ hostname
daic01.hpc.tudelft.nl

$ salloc --account=<your-account> --partition=all --gres=gpu:1 --mem=8G --time=01:00:00
salloc: Granted job allocation 12345

$ srun apptainer exec --nv myimage.sif python script.py
This helps verify everything works before submitting a batch job with sbatch.
How to get container files?
You can obtain container images in two main ways:
- Pull prebuilt images by pulling from a container registry/repository (see Using prebuilt images).
- Build your own image locally using a definition file (
*.def), then transfer the resulting.siffile to DAIC (see Building images).
1. Using prebuilt images
Apptainer allows pulling and using images directly from repositories like DockerHub, BioContainers, NVIDIA GPU Cloud (NGC), and others.
Example: Pulling from DockerHub
$ mkdir ~/containers && cd ~/containers

$ apptainer pull docker://ubuntu:latest
INFO:    Converting OCI blobs to SIF format
INFO:    Starting build...
Getting image source signatures
Copying blob 837dd4791cdc done
Copying config 1f6ddc1b25 done
Writing manifest to image destination
...
INFO:    Creating SIF file...
Now, to check the obtained image file:
$ ls
ubuntu_latest.sif

$ apptainer exec ubuntu_latest.sif cat /etc/os-release
PRETTY_NAME="Ubuntu 22.04.2 LTS"
NAME="Ubuntu"
VERSION_ID="22.04"
...

$ ls /.apptainer.d/
ls: cannot access /.apptainer.d/: No such file or directory

$ apptainer shell ubuntu_latest.sif
Apptainer> hostname
daic01.hpc.tudelft.nl
Apptainer> ls /.apptainer.d/
Apptainer  actions  env  labels.json  libs  runscript  startscript
Apptainer> exit
Notes:
- Inside the container, the command prompt changes to
Apptainer> - The container inherits your environment (e.g.,
$HOME,hostname) but has its own internal filesystem (e.g./.apptainer.d)
Tip: Isolate your host filesystem
To prevent accidental deletes/edits, add -c or -C flags to your apptainer commands to isolate filesystems:
$ apptainer shell -C ubuntu_latest.sif
Example: Pulling from NVIDIA GPU cloud (NGC)
NGC provides pre-built images for GPU accelerated applications. These images are large, so download them locally on your machine and then transfer to DAIC. To install Apptainer locally, follow the official Installing Apptainer instructions.
Important: Cache and filesystem limits
By default, Apptainer images are saved to ~/.apptainer. To avoid quota issues, set the environment variable APPTAINER_CACHEDIR to a different location.
export APPTAINER_CACHEDIR=/tudelft.net/staff-umbrella/<project>/apptainer/cache
Pulling directly to bulk or umbrella is not supported, so pull large images locally, then copy the *.sif file to DAIC.
On your local machine:
$ apptainer pull docker://nvcr.io/nvidia/pytorch:24.01-py3
$ scp pytorch_24.01-py3.sif daic01.hpc.tudelft.nl:/tudelft.net/staff-umbrella/<project>/apptainer
Test the image on DAIC:
$ cd /tudelft.net/staff-umbrella/<project>/apptainer

$ salloc --account=<your-account> --partition=all --gres=gpu:1 --time=00:10:00
salloc: Granted job allocation 12345

$ srun apptainer shell -C --nv pytorch_24.01-py3.sif
Apptainer> python -c "import torch; print(torch.cuda.is_available())"
True
2. Building images
If you prefer (or need) a custom container image, you can build one from a definition file (*.def), that specifies your dependencies and setup steps.
On DAIC, you can build images directly if your current directory allows writes and sufficient quota (e.g., under staff-umbrella).
For large or complex builds, it can be more convenient to build locally on your workstation and then transfer the resulting .sif file to DAIC.
Tip: Root privileges not always required
Apptainer supports rootless builds.
You only need sudo when:
- building from base images that require root setup (e.g.,
Bootstrap: dockeron older systems), or - writing the resulting image to a protected location.
Otherwise, you can build directly:
$ apptainer build myimage.sif myimage.def
Example: CUDA-enabled container
An example definion file, cuda_based.def, for a cuda-enabled container may look as follows:
# Header
Bootstrap: docker
From: nvidia/cuda:12.1.1-devel-ubuntu22.04

# (Optional) Sections/ data blobs
%post
    apt-get update # update system
    apt-get install -y git   # install git
    git clone https://github.com/NVIDIA/cuda-samples.git  # clone target repository
    cd cuda-samples
    git fetch origin --tags && git checkout v12.1 # fetch certain repository version
    cd Samples/1_Utilities/deviceQuery && make # install certain tool

%runscript
    /cuda-samples/Samples/1_Utilities/deviceQuery/deviceQuery
where:
- The header, specifies the source (eg,
Bootstrap: docker) and the base image (From: nvidia/cuda:12.1.1-devel-ubuntu22.04). Here, the container builds on Ubuntu 22.04 with CUDA 12.1 pre-installed. - The rest of the file are optional data blobs or sections. In this example, the following blobs are used:
%post: the steps to download, configure and install needed custom software and libraries on the base image. In this example, the steps installgit, clone a repo, and install a package viamake%runscript: the entry point to the container with theapptainer runcommand. In this example, thedeviceQueryis executed once the container is run.- Other blobs may be present in the
deffile. See Definition files documentation for more details and examples.
Build this image locally and transfer it to DAIC:
$ apptainer build cuda_based_image.sif cuda_based.def
INFO:    Starting build...
Getting image source signatures
...
INFO:    Adding runscript
INFO:    Creating SIF file...
INFO:    Build complete: cuda_based_image.sif

$ scp cuda_based_image.sif daic01.hpc.tudelft.nl:/tudelft.net/staff-umbrella/<project>/apptainer
On DAIC, test the image:
$ cd /tudelft.net/staff-umbrella/<project>/apptainer

$ salloc --account=<your-account> --partition=all --cpus-per-task=2 --mem=1G --gres=gpu:1 --time=00:10:00
salloc: Granted job allocation 12345

$ srun apptainer run --nv -C cuda_based_image.sif
/cuda-samples/Samples/1_Utilities/deviceQuery/deviceQuery Starting...

 CUDA Device Query (Runtime API) version (CUDART static linking)

Detected 1 CUDA Capable device(s)

Device 0: "NVIDIA L40"
  CUDA Driver Version / Runtime Version          12.9 / 12.1
  CUDA Capability Major/Minor version number:    8.9
  Total amount of global memory:                 46068 MBytes
  ...
deviceQuery, CUDA Driver = CUDART, CUDA Driver Version = 12.9, CUDA Runtime Version = 12.1, NumDevs = 1
Result = PASS
Tip: Enable GPU access
Always pass --nv to apptainer for GPU-accelerated workloads:
$ apptainer shell --nv -C cuda_based_image.sif
The host must have NVIDIA GPU drivers installed and the container must include CUDA dependencies.
Note on reproducibility
Definition-file builds are the most reproducible approach. However, in cases of complex dependencies, you can first prototype interactively inwritable sandbox mode first. In such cases, take note of all installation commands used in the sandbox, so you can include them in a recipe file. See Apptainer Sandbox Directories for more details.Example: Extending existing images
During software development, it is common to incrementally build code and go through many iterations of debugging and testing.
To save time, you can base a new image on an existing one using the Bootstrap: localimage and From:<path/to/local/image> header.
This avoids re-installing the same dependencies with every iteration.
As an example, assume it is desirable to develop some code on the basis of the cuda_based.sif image created in the Example: CUDA-enabled container. Building from the original cuda_based.def file can take ~ 4 minutes. However, if the *.sif file is already available, building on top of it, via a dev_on_cuda_based.def file as below, takes ~ 2 minutes. This is already a time saving factor of 2.
# Header
Bootstrap: localimage
From: cuda_based.sif

# (Optional) Sections/ data blobs
%runscript
    echo "Arguments received: $*"
    exec echo "$@"
Now, build and test:
$ apptainer build dev_image.sif dev_on_cuda_based.def
INFO:    Starting build...
INFO:    Verifying bootstrap image cuda_based.sif
INFO:    Adding runscript
INFO:    Creating SIF file...
INFO:    Build complete: dev_image.sif

$ apptainer run dev_image.sif "hello world"
Arguments received: hello world
hello world

$ apptainer shell dev_image.sif
Apptainer> ls /cuda-samples/Samples/1_Utilities/deviceQuery/deviceQuery
/cuda-samples/Samples/1_Utilities/deviceQuery/deviceQuery

Apptainer> cat /.apptainer.d/bootstrap_history/Apptainer0
bootstrap: docker
from: nvidia/cuda:12.1.1-devel-ubuntu22.04
...
As can be seen in this example, the new def file not only preserves the dependencies of the original image, but it also preserves a complete history of all build processes while giving flexible environment that can be customized as need arises.
Example: Deploying conda and pip in a container
There might be situations where you have a certain conda environment in your local machine that you need to set up in DAIC to commence your analysis. In such cases, deploying your conda environment in a container and sending this container to DAIC does the job for you.
As an example, let’s create a simple demo environment, environment.yml in our local machine,
name: apptainer
channels:
  - conda-forge
  - defaults
dependencies:
  - python=3.9
  - matplotlib
  - pip
  - pip:
    - -r requirements.txt
And everything that should be installed with pip in requirement.txt file:
--extra-index-url https://download.pytorch.org/whl/cu123
torch
annoy
Now, it is time to create the container definition file Apptainer.def. One option is to base the image on condaforge/miniforge, which is a minimal Ubuntu installation with conda preinstalled at /opt/conda:
Bootstrap: docker
From: condaforge/miniforge3:latest

%files
    environment.yml /environment.yml
    requirements.txt /requirements.txt

%post
    # Update and install necessary packages
    apt-get update && apt-get install -y tree time vim ncdu speedtest-cli build-essential

    # Create a new Conda environment using the environment files.
    mamba env create --quiet --file /environment.yml

    # Clean up
    apt-get clean && rm -rf /var/lib/apt/lists/*
    mamba clean --all -y

    # Now add the script to activate the Conda environment
    echo '. "/opt/conda/etc/profile.d/conda.sh"' >> $APPTAINER_ENVIRONMENT
    echo 'conda activate apptainer' >> $APPTAINER_ENVIRONMENT
APPTAINER_ENVIRONMENT
The $APPTAINER_ENVIRONMENT variable in Apptainer refers to a special shell script that gets sourced when a container is run in shell mode. This is a key mechanism for setting up the environment for your container.
Here’s what’s happening in the code:
echo '. "/opt/conda/etc/profile.d/conda.sh"' >> $APPTAINER_ENVIRONMENT- This adds a command to source the Conda initialization script
- The script enables the
condacommand in your shell environment
echo 'conda activate apptainer' >> $APPTAINER_ENVIRONMENT- This adds a command to activate the “apptainer” Conda environment
- This ensures your container automatically starts with the right environment activated
When a user runs your container with apptainer shell my-container.sif, these commands will execute automatically, ensuring:
- The conda command is available
- The “apptainer” environment is activated
- All the Python packages specified in your
environment.ymlare available
This approach is much cleaner than requiring users to manually activate the environment every time they run the container. It makes your container more user-friendly and ensures consistent behavior.
This file is similar to the file in the Building images, with the addition of %files area. %files specifies the files in the host system (ie, your machine) that need to be copied to the container image, and optionally, where should they be available. In the previous example, the environment.yml file will be available in /opt/ in the container.
Now, build and check the image:
$ apptainer build demo-env-image.sif Apptainer.def
INFO:    Starting build...
Getting image source signatures
...
INFO:    Creating SIF file...
INFO:    Build complete: demo-env-image.sif
Verify the container setup:
$ apptainer exec demo-env-image.sif which python
/opt/conda/envs/apptainer/bin/python
Perfect! This confirms that our container image built successfully and the Conda environment is automatically activated. The Python executable is correctly pointing to our custom environment path, indicating that all our dependencies should be available.
We are going to use the environment inside a container together with a Python script that we store outside the container.
Create the file analysis.py, which generate a plot:
#!/usr/bin/env python3

import matplotlib.pyplot as plt
import numpy as np

x = np.linspace(0, 2 * np.pi, 100)
y = np.sin(x)

plt.plot(x, y)
plt.title('Sine Wave')
plt.savefig('sine_wave.png')
Now, run the analysis:
$ apptainer exec demo-env-image.sif python analysis.py
$ ls
sine_wave.png
Warning
In the last example, the container read and wrote a file to the host system directly. This behavior is risky. You are strongly recommended to expose only the desired host directories to the container. See Exposing host directoriesExposing host directories
Depending on use case, it may be necessary for the container to read or write data from or to the host system. For example, to expose only files in a host directory called ProjectDataDir to the container image’s /mnt directory, add the --bind directive with appropriate <hostDir>:<containerDir> mapping to the commands you use to launch the container, in conjunction with the -C flag eg, shell or exec as below:
$ ls ProjectDataDir
raw_data.txt

$ apptainer shell -C --bind ProjectDataDir:/mnt ubuntu_latest.sif
Apptainer> ls /mnt
raw_data.txt
Apptainer> echo "Date: $(date)" >> /mnt/raw_data.txt
Apptainer> exit

$ tail -n1 ProjectDataDir/raw_data.txt
Date: Fri Mar 20 10:30:00 CET 2026
If the desire is to expose this directory as read-only inside the container, the --mount directive should be used instead of --bind, with rodesignation as follows:
$ apptainer shell -C --mount type=bind,source=ProjectDataDir,destination=/mnt,ro ubuntu_latest.sif
Apptainer> ls /mnt
raw_data.txt
Apptainer> echo "Date: $(date)" >> /mnt/raw_data.txt
bash: /mnt/raw_data.txt: Read-only file system
Advanced: containers and (fake) native installation
It’s possible to use Apptainer to install and then use software as if it were installed natively in the host system. For example, if you are a bioinformatician, you may be using software like samtools or bcftools for many of your analyses, and it may be advantageous to call it directly. Let’s take this as an illustrative example:
- Create a directory structure: an
execdirectory for container images and abindirectory for symlinks:
$ mkdir -p software/bin/ software/exec
- Create a definition file and build the image:
$ cd software/exec

$ cat bio-recipe.def
Bootstrap: docker
From: ubuntu:latest
%post
    apt-get update
    apt-get install -y samtools bcftools
    apt-get clean

$ apptainer build bio-container.sif bio-recipe.def
- Create a wrapper script:
$ cat wrapper_bio-container.sh
#!/bin/bash
containerdir="$(dirname $(readlink -f ${BASH_SOURCE[0]}))"
cmd="$(basename $0)"
apptainer exec "${containerdir}/bio-container.sif" "$cmd" "$@"

$ chmod +x wrapper_bio-container.sh
- Create symlinks:
$ cd ../bin
$ ln -s ../exec/wrapper_bio-container.sh samtools
$ ln -s ../exec/wrapper_bio-container.sh bcftools
- Add the directory to your
$PATHand use the tools:
$ export PATH=$PATH:$PWD

$ bcftools -v
bcftools 1.13
Using htslib 1.13+ds
...

$ samtools version
samtools 1.13
Using htslib 1.13+ds
...
Note
The final directory structure:
software/
├── bin
│   ├── bcftools -> ../exec/wrapper_bio-container.sh
│   └── samtools -> ../exec/wrapper_bio-container.sh
└── exec
    ├── bio-container.sif
    └── wrapper_bio-container.sh
To make this permanent, add to your shell profile:
echo 'export PATH=$PATH:/path/to/software/bin' >> ~/.bashrc
Exercises
Practice what you’ve learned with these hands-on exercises.
Exercise 1: Pull and explore an image
Pull the python:3.11-slim image from Docker Hub and explore it:
- Use
apptainer pullto download the image - Use
apptainer shellto open an interactive session - Check the Python version inside the container
- List the contents of
/usr/local/lib/python3.11/ - Exit the container
Check your work
After pulling, you should have python_3.11-slim.sif. Inside the container:
Apptainer> python --version
Python 3.11.x
Apptainer> ls /usr/local/lib/python3.11/
...  site-packages  ...
Exercise 2: Run a command in a container
Using the Python image from Exercise 1:
- Create a simple Python script
hello.pythat prints “Hello from Apptainer!” - Use
apptainer execto run the script inside the container - Try running it with the
-Cflag - what happens to your script?
Check your work
Without -C:
$ apptainer exec python_3.11-slim.sif python hello.py
Hello from Apptainer!
With -C, you get an error because the container can’t see your files:
$ apptainer exec -C python_3.11-slim.sif python hello.py
python: can't open file 'hello.py': [Errno 2] No such file or directory
Exercise 3: Build a custom image
Create a definition file for a container with your favorite tools:
- Start from
ubuntu:22.04 - Install at least two packages (e.g.,
curlandjq) - Add a
%runscriptthat displays a welcome message - Build the image and test it with
apptainer run
Check your work
After building:
$ apptainer run mytools.sif
Welcome to my custom container!
$ apptainer exec mytools.sif which curl jq
/usr/bin/curl
/usr/bin/jq
Exercise 4: GPU container on DAIC
Test GPU access with a prebuilt image:
- Request an interactive GPU session with
salloc - Pull or use an existing PyTorch NGC image
- Run a Python command that checks
torch.cuda.is_available() - Verify the GPU is detected with
nvidia-smiinside the container
Check your work
$ srun apptainer exec --nv pytorch.sif python -c "import torch; print(torch.cuda.is_available())"
True
$ srun apptainer exec --nv pytorch.sif nvidia-smi
... (GPU info displayed) ...
If you see False, check that you used --nv and requested a GPU with --gres=gpu:1.
Exercise 5: Bind mounts
Practice data isolation:
- Create a directory with a test file
- Run a container with
-C(isolated) and--bindto mount only that directory - Inside the container, verify you can access the test file but not your home directory
- Try mounting the directory as read-only with
--mount
Check your work
$ mkdir testdir && echo "test" > testdir/data.txt
$ apptainer shell -C --bind testdir:/mnt ubuntu_latest.sif
Apptainer> cat /mnt/data.txt
test
Apptainer> ls /home/$USER
ls: cannot access '/home/...': No such file or directory
With read-only mount, writing fails:
$ apptainer shell -C --mount type=bind,source=testdir,destination=/mnt,ro ubuntu_latest.sif
Apptainer> echo "new" >> /mnt/data.txt
bash: /mnt/data.txt: Read-only file system
Troubleshooting
Build fails with “no space left on device”
Apptainer uses your home directory for temporary files during builds. Since /home on DAIC is limited to 5 MB, builds often fail.
Solution: Set a different cache directory before building:
$ export APPTAINER_CACHEDIR=/tudelft.net/staff-umbrella/<project>/apptainer/cache
$ export APPTAINER_TMPDIR=/tudelft.net/staff-umbrella/<project>/apptainer/tmp
$ mkdir -p $APPTAINER_CACHEDIR $APPTAINER_TMPDIR
Add these to your ~/.bashrc to make them permanent.
GPU not visible inside container
Your container runs but torch.cuda.is_available() returns False or nvidia-smi fails.
Possible causes and solutions:
Missing
--nvflag: Always pass--nvto enable GPU access:$ apptainer exec --nv myimage.sif python -c "import torch; print(torch.cuda.is_available())"Not running on a GPU node: Check that you requested a GPU and are using
srun:$ salloc --gres=gpu:1 ... $ srun apptainer exec --nv myimage.sif nvidia-smiCUDA version mismatch: The container’s CUDA version must be compatible with the host driver. Check host driver version:
$ nvidia-smi | grep "Driver Version"
Cache filling up disk space
Apptainer caches pulled images and build layers. This can consume significant space over time.
Solution: Periodically clean the cache:
$ apptainer cache clean
To see cache usage:
$ apptainer cache list
Container can’t access my files
By default, Apptainer mounts your home directory and current working directory. With -C (contain), the container is isolated.
Solution: Explicitly bind the directories you need:
$ apptainer exec -C --bind /tudelft.net/staff-umbrella/myproject:/data myimage.sif ls /data
Summary
You learned how to:
- Pull images from Docker Hub and NVIDIA NGC
- Build images from definition files with
%postand%runscriptsections - Run containers with
shell,exec, andruncommands - Enable GPU access with the
--nvflag - Isolate filesystems with
-Cand selectively expose directories with--bind - Manage cache by setting
APPTAINER_CACHEDIR
Key commands
| Command | Purpose |
|---|---|
apptainer pull docker://image:tag | Download image from registry |
apptainer build image.sif recipe.def | Build image from definition file |
apptainer shell image.sif | Interactive shell in container |
apptainer exec image.sif command | Run single command in container |
apptainer run image.sif | Execute container’s runscript |
--nv | Enable GPU passthrough |
-C | Isolate container filesystem |
--bind host:container | Mount host directory in container |
What’s next?
- Learn Vim for editing files directly on the cluster
- See Container GPU Jobs for batch job examples
- Explore Apptainer documentation for advanced features